How to install minecraft server minecraft. How to install Minecraft server and put mods on it.
Before you start installation mod on Minecraft, it is necessary to copy all your save to the game in any folder, in case you save, you can restore them without any problems.
1 . The first thing you need to download any mod for the game. There are a lot of mods for minecraft, you can choose the modification you are interested in in the section .
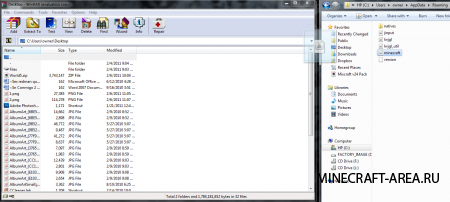
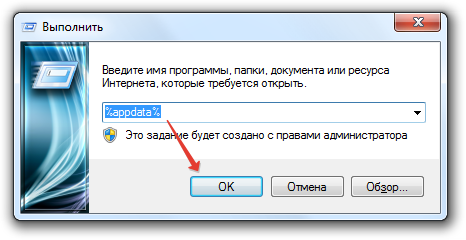
2 . After downloading the mod, you need to open a file called minecraft .jar. You can find it in this folder: Name- user AppDataRoaming.minecraftbin. If you did not find the minecraft .jar file, you can find it using Search, you need to enter minecraft .jar in the search and the explorer will give you the results. You can also see other search options in the article..
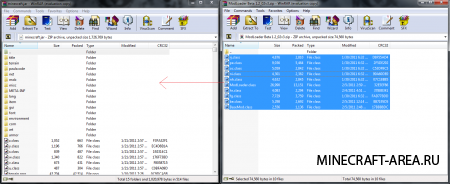
3 . Open up minecraft .jar via Winrar.
4 . At the same time, you need to open the mod file and copy it into the system file of the game minecraft .jar. Please note that the mods can contain not only files, but also folders, which means that you must copy them. In these screenshots, we show you an example of installing a mod for minecraft from Zhar
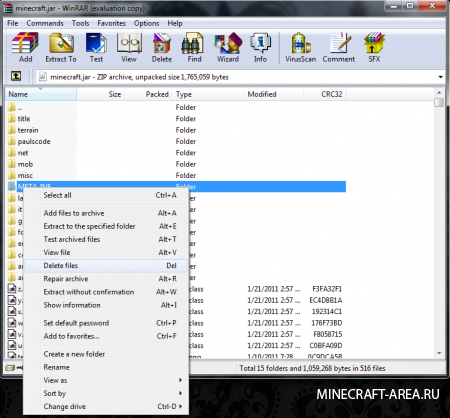
5. Delete the folder with the name META- INF , she is in minecraft .jar.Save the changes and close WinRar.
6. Open the game, the mod works!
If the game will not work properly or you will have a black screen during the launch, you need to do this:
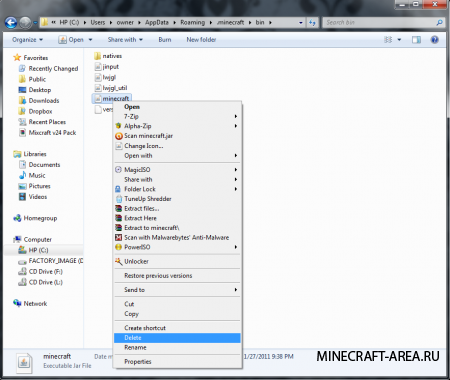
Delete the minecraft .jar file, the one that is in the folder atC: UsersName _ user AppDataRoaming.minecraftbin.
After that, you need to start the game again, it should automatically restore this file and work correctly again.
It may happen that you did not copy all the files. If you still want to install this mod, then carefully make sure that you have copied all the files into the system file of the game. Everything will work only when the downloaded mod is working, if the mod is broken, then reinstalling will not help here.
Installing the mod on the server
Installing the mod on the server is almost the same, except that you need to copy the mod to a file called minecraft _server.jarand Do notdelete folder META-INF.
How to install separate mods on minecraft version 1.6.1
So proceed to install the mod on version 1.6.1
Go to the folder% appdata% /. Minecraft / versions
Copy the folder 1.6.1 and paste as 1.6.1 (the name of the mod) - now there should be 2 folders 1.6.1 (the name of the mod) and 1.6.1
Go to the new folder and change the name of the jar and json files in the same way as the folder
Open json with Notepad or some other text editor and replace it with:
"id": "1.6.1",
on
"id": "1.6.1 (mod name)",
Similarly, you need to do with the jar file
mod installed!
Be sure to check out the installation view of the mod on the server
Install a mod called Cube World
Installation
1. Go to the game folder% appdata% /. Minecraft / versions
2. Copy and rename folder 1.6.1 to Cube_World_1.6.1 Now you have 2 folders 1.6.1 and Cube_World_1.6.1
3. In the new folder, we change the name of the files 1.6.1.jar and 1.6.1.json to Cube_World_1.6.1.jar and Cube_World_1.6.1.json
4. Open the file Cube_World_1.6.1.json Notepad
5. Change the "id": "1.6.1" to "id": "Cube_World_1.6.1" and save the changes
6.Open the Cube_World_1.6.1.jar with the help of the archiver and copy all the mod files to Cube_World_1.6.1.jar. Delete the META-INF folder from the Cube_World_1.6.1.jar file
7. Open the Minecraft Launcher and create a new profile. In the window with the versions Use version, select Cube_World_1.6.1
You will need
- - admin rights
- - installation files for Minecraft Forge and ModLoader
- - installer for the desired mod
- - any archiver
Instruction
It is important to make a reservation: you have the opportunity to install plug-ins and, in general, any software products on the multiplayer only when you have administrative authority on such a resource. Ordinary players in such actions are not eligible. The admin, before performing them, must necessarily conduct some training. Be sure to copy all game saves to a folder specially created for this purpose - in case of any server failure during the installation of plug-ins. Then, even if this happens, you can easily restore the original state of the resource. Otherwise, all its users will be forced to start the gameplay from scratch.
First of all, install two global mods, on top of which you will install the rest, ModLoader and Minecraft Forge. After downloading their installation files, first open the archive of the first one with any special archiver program. Log in to the server jar too. Select all folders in the first one, except for META.INF (if present, no mod will start) and transfer it to the second one. Check the server after such manipulations and be sure to do the same after each step of installing the modifications. Wait until the Done sign appears on the screen that appears and stop the game resource with the / stop command. Repeat the above steps with Minecraft Forge.
Download the mod you are interested in from a reliable resource offering software for Minecraft. You can - if you wish and have certain skills - create such a software product yourself. In any case, make sure that the mod is working and not beaten. In the second case, it will not run anyway, but it may cause some problems in the functioning of the server (which obviously will not contribute to the growth of its popularity among gamers).
Install the required mod in the same way - by transferring its files from the archive to the directory with your game resource. Look, if META.INF was saved there (although if there are already any modifications on the server, there should not be such a folder). Re-check the performance of the game resource. If after starting the server with the mod a black screen appears and the gameplay does not start, check whether there is a bin folder in the minecraft.jar directory. In the case when it is preserved there, delete it - otherwise the game will not function. Minecraft will launch the necessary files automatically after launch, but now they will be compatible with the new mods.
Despite the initially infinite possibilities for creating your own world in Minecraft, here you can also add game content by installing various mods.
Add modification
First, let's figure out how to install the mod on the client Minecraft. If you have already tried to install cheats on Minecraft, then cope with this task without difficulty.
If inside the “minecraft.jar” directory there is a “META-INF” folder, delete it, otherwise the client will not start.
After adding files, you can run the game and check its performance.
Mod Herobrin
Each player in Minecraft heard the legend of Herobrine - a mysterious character with white eyes, which can be seen in the fog. He does not craft anything, does not have a nickname above his head, and may appear in your world, even if you are playing in single player mode and are not connected to the Internet.
If you are intrigued by this story, you do not need to wait for the appearance of this maynkraftovskoy legends, vainly peering into the fog. Install mod on Herobrina and have fun, fleeing from his pursuit. 
Usually, the installation of Herobrin's mod does not differ from the installation of other modifications and consists in transferring files from the archive to the “minecraft.jar” directory. However, you can download different versions of the modification, respectively, and the order of installation will be different. Therefore, be sure to read the “readme” files that are inside the archive - the installation order is always indicated there.
Sometimes it is enough to run the file “EasyModInstaller.jar”, which is stored in the archive with a modification, select your “minecraft.jar” and install it.
Installing the mod on the server
We dealt with the client, now let's see how to install the mod on minecraft on the server.
Important! If you put a mod on the server, make sure that it stands on your client, otherwise the game will not work correctly.
In addition, these same modes must be installed with your friends, otherwise they will not be able to connect to the server you created.
When installing the mod on the server DO NOT delete the folder "META-INF"! It is necessary to erase it only at installation of modification on the client.
Run the batch file again to check the server. Delete the appeared worlds and pay attention to the “mods” folder - you just need to upload downloaded archives with modifications into it, after which they will appear on the server.
Installation mod on the example of Industrial Craft2
Customer:1. Open "... /. Minecraft / bin / minecraft.jar" with any archiver.
2. Delete the folder "META-INF".
3. Copy the contents of mod archives to "... /. Minecraft / bin / minecraft.jar":
SpaceToad "s MCForge
4. Download the mod itself
5. put industrialcraft-2.jar in "... /. Minecraft / mods" (the folder is created when the client starts with the above modifications, you can create it yourself).
6. Close the archive and play.
If the game does not start, try deleting (renaming) the config folder.
Server
1. Open minecraft_server.jar with any archiver.
2. Copy the contents of SpaceToad "s MCForge - API to minecraft_server.jar.
3. Download IC2
4. Move the industrialcraft-2-server_x.xxx.jar file to the "... / mods /" folder of the server directory (the "mods" folder is created when the server is started or you can create it yourself), where x.xxx is the version of the mod.
5. If you have already started the server, then you need to generate a new world, because IC2 adds new ores, for this, in the server directory, delete the folders: "world", "world_nether", "world_the_end".
6. Start the server and play!
ATTENTION! Do not delete the "META-INF" folder in serverXXXX.jar; The IC2 versions installed on the server and client must match.
Installing plugins in Minecraft
Installing plug-ins is very simple and does not require a lot of effort, installation in just a few steps, for this you need an already installed CraftBukkit:1. Download the plugin you need.
2. Copy the .jar file and other required files to the "plugins" folder in the server folder.
3. Start the server and wait until it is fully loaded.
4. Enter stop in your server console to safely stop it.
5. Start the server again.
6. Everything! Now your plugin is installed and ready to go.
Update plugins in Minecraft:
1 You need to create an "update" folder inside the "plugins" folder.
2 Then you should download the new version of the plugin that you want to update.
3 Move the updated plugin to the newly created .jar file in the created folder.
4 Then restart your server by entering the stop command in the console, then start.
5 Everything, the plugin is updated!
Configuring plugin configuration files
All configuration files (configs) have the .yml extension, it can be edited with any text editor. As a rule, plugin configs are located at: /plugins/ Plugin_name/config.yml. The description of the settings is usually on the download page of the plugin.
The main configuration file for Bukkita is bukkit.yml, which is located at the root of the server. This file contains all the necessary variables to control the gameplay.
Part with description:
settings: allow-end: true (edge on) warn-on-overload: true spawn-radius: 1 (radius of spawn, operators can dig on it) permissions-file: permissions.yml (access file) update-folder: update (folder for updates) ping-packet-limit: 1000 (time limit before time out) aliases: icanhasbukkit: version database: username: bukkit (database user name) isolation: SERIALIZABLE driver: org.sqlite.JDBC (database type) password: walrus (database user password) url: jdbc: sqlite: (DIR) (NAME) .db (database path)
If you have gaps with the installation of plug-ins or mods, please contact