X box 360 how to connect
Turn on your and go to your native dashboard (press the Xbox button on the gamepad then press Y and hold RB press OK in a new window, do not release the RB button will also return to the Freeboot dashboard)
- go to the system parameters
- network settings
- set up network
- main settings tab
- subnet mask 255.255.255.0
- we do not need a gateway (do not go to the partition then it will be 0.0.0.0 by default.)
- save settings by clicking finish
2. The computer is connected to the router, the settings of the router are set by default.
- Connect the Xbox to the router with a network cable.
3. Install Total Commander on the PC
4. Start Total Commander
5. Click Ctrl + F Add, remove all checkmarks. Account and Xbox password. Server / Port Prescribe 192.168.0.2:21. Connection name at your discretion. Click save and click connect.
How to connect Xbox to PC if there is no router:
1. From the beginning, you need to configure your console:
- Turn on your Xbox and go to your native dashboard (press the Xbox button on the gamepad then press Y and hold RB press OK in the new window; do not release the RB button will also return to the Freeboot dashboard)
- go to the system parameters
- network settings
- set up network
- main settings tab
- select the manual mode of the parameters of the ip-address
- ip-address is prescribed 192.168.0.2
- subnet mask 255.255.255.0
- we do not need a gateway, we prescribe 0.0.0.0
- save settings by clicking finish
- run freestyle dash, xexmenu or any jtag-software with built-in ftp-server.
- on the PC we go with Network connections
- Connection properties by local network
2. Now the PC
- Go to the network environment
- LAN connections click Properties
- Internet Protocol TCP / IP
- All settings are driven manually:
- ip-address is prescribed 192.168.0.2
- subnet mask 255.255.255.0
- All other fields are left blank.
- click OK
- reboot the PC
- Launches Total Commander
- press Ctrl + F
- Click Ctrl + F Add, remove all checkmarks. Account and Xbox password. Server / Port Prescribe 192.168.0.2:21. Connection name at your discretion. Click save and click connect.
Follow these steps to install a wired Xbox 360 gamepad on Windows 10.
- Connect your Xbox 360 gamepad to any USB port version 2.0 or 3.0 of your computer.
- Drivers for Xbox gamepads are automatically installed with Windows 10. You do not need to download and install anything other than Windows 10 updates. After a notification appears about the successful installation of drivers, you can use the gamepad.
- Open the game or the Xbox application and test the gamepad operation by pressing buttons, knobs and moving the mini-joystick.
Notes.
- If the wired Xbox 360 gamepad is not detected by the computer, try connecting it to another USB port and repeat the check.
- If the gamepad still does not work, make sure that the complete windows update 10. Install all available updates and run the check again.
Setting up a wired gamepad on Windows 8.1 or Windows 8
Drivers for Windows 8 and Windows 8.1 are installed by default. Connect the gamepad to the USB port to complete the driver installation.
If you have problems with the driver, you can install the software for the gamepad on a PC with Windows 8.1 or Windows 8 in the Windows 7 compatibility mode. To do this, follow these steps:
- Go to the Xbox 360 Gamepad for Windows.
- Scroll down and select Downloads. Select windows version 7 corresponding to the processor of your computer:
- Windows 7 (32-bit only);
- Windows 7 (64-bit only).
- Drop-down list Languages Choose language operating system.
- Click the link to software below the drop-down list of languages.
- Save the file.
- In the folder where the program file is saved, right-click the file and select Properties.
- Tab Compatibility check the box Run this program in compatibility modeand then select Windows 7 in the dropdown list.
- Select To apply and click the button Ok.
- Double-click the installer to launch it. The installer of accessories for Xbox 360 will install the necessary files on your computer. After the process is complete, you may be prompted to restart the computer.
Connect your Xbox 360 wired controller to any USB port version 2.0 or 3.0 of your computer.
Step 3. Check gamepad
- Open the dialog box Gamepads.
- In Windows 8. On the initial on the computer screen, type joy.cpl. Then in the search results select joy.cpl.
- Select Xbox 360 Gamepad and click Properties.
- Test your wired Xbox 360 gamepad by pushing buttons, tilting the knobs or moving the mini-joystick.
- If the gamepad was not detected by the computer, try connecting it to another USB port and repeat the test.
For information on setting up an Xbox 360 gamepad, see the documentation for the game with which you intend to use it.
Setting up a wired gamepad on Windows 7
Step 1. Install the Xbox 360 Gamepad Software for Windows
You can install the Xbox 360 gamepad software for Windows in one of two ways.
Note. The standard wired Xbox 360 gamepad can be connected to a Windows computer using a USB port, but drivers should be installed to work with it.
Install from CD
To install the software from the installation disc that came with your Xbox 360 gamepad, follow these steps:
- Insert the installation disc into your computer's CD or DVD drive. If the installation program does not start automatically, start it from a CD or DVD manually.
- On the screen installations select Install.
- The installer of accessories for Xbox 360 will install the necessary files on your computer.
Note.
- Go to the Xbox 360 Gamepad for Windows. In the product list, select Downloads.
- In the "Software and Drivers" section, select the appropriate version of Windows (7, Vista or XP only) and the language in the drop-down menu. For example, if "Russian (Russia)" is selected for "Region and Language", select "Russian" in the "Language" list.
- Click the download link (below the drop-down menus).
- Open the EXE file downloaded using the web browser and, if necessary, click Yesto start the installation.
- Choose a team Launch. The Xbox 360 program will install the necessary files on your computer. After the process is complete, you may be prompted to restart the computer.
Step 2. Connect the wired Xbox 360 gamepad to your computer
After installing the software, connect the USB connector of the wired Xbox gamepad to the USB port version 2.0 or 3.0 on your computer.
Step 3. Check gamepad
- On the computer, click Startenter Runenter joy.cpl and press ENTER.
- Select Xbox 360 Gamepad and click Properties.
- Test your wired Xbox 360 gamepad by pushing buttons, tilting the knobs or moving the mini-joystick. If the gamepad is working correctly, the corresponding information will appear in the application.
If the application does not detect a gamepad, try connecting it to another USB port and repeat the test. If the application did not recognize the gamepad after this, see the Troubleshooting section for the Xbox 360 gamepad for Windows.
Setting up a wireless gamepad on a Windows computer
Note. A standard Xbox 360 wireless gamepad can be connected to a Windows PC, but the game requires a Xbox 360 Windows console wireless receiver, even if you have an Xbox 360 charger.
Step 1. Connect your Xbox 360 wireless gaming receiver to your computer.
- Remove the green sticker from the USB connector on the receiver.
- Insert the receiver's USB connector into uSB port 2.0, which is powered (on the front or back of the computer).
Note. The USB ports on the front of the computer may not be powered by USB 2.0. Try using one of the ports on the back of your computer.
If the indicator is green, the device is working normally.
Step 2: Install the Xbox Receiver Software
Install the software from the installation disc that came with your Xbox 360 wireless receiver. If you do not have the disc, you can download the software from the Internet.
Install from CD
- Insert the disc into the computer drive. If the installation program does not start automatically, start it from a CD or DVD manually.
Follow the software installation instructions.
Note. After the installation is complete, you may need to restart the computer.
Installation after software download
- Go to the software download section of the Microsoft Hardware website.
- In field Search for download enter xbox and select product type Play.
- Choose a product Xbox 360 Wireless Controller for Windows (software for wireless receiver).
- Select your Microsoft Windows version and operating system language and click Download.
- Choose a team Launch.
- The installer of accessories for Xbox 360 will install the necessary files on your computer.
Note. After the installation is complete, you may need to restart the computer.
You can connect the console to the Internet in several ways - directly (simply by plugging the power cord from the provider into the console), using a router or an ADSL modem which has a router function or via a computer.
1. Directly. If you have a network cable from the provider to the apartment and you don’t run anything on the computer to go online, i.e. turn on the computer and the Internet is already there - then most likely you are identified in the network by the MAC address. It is possible that the network card must be specifically configured. In this case, if you have a PS3, then you can not read further, you are not lucky (in PS3 you cannot change the MAC address), if you have an Xbox 360 then you need to write down all the network settings on the paper, write the MAC address (it is also called physical address) and enter all this into the network settings in the console. Where to find out these settings is written above. In short: Start - cmd - ipconfig / all All, you can connect the X360 directly.
The second is through a router. The most convenient, but you need to configure the router correctly, which is often not as easy as it seems. But you do not need to change the wires each time and turn on the computer to play in the internet with the console.
If you have ADSL, then look at how many network outlets you have in your modem. If more than one, then your modem can work in router mode. You need to figure out how to do it (it should be easy) and then you and the computer will not need to run anything to connect to the Internet, and the console can be connected directly to the modem and nothing in it (in the console) is configured additionally. Everything should work.
If you are unlucky and there is only one network exit from the modem, then there is nothing to worry about, you can still connect directly, but in the console you need to configure the PPPOE parameters, i.e. Enter the login and password of your ADSL connection, well, you will have to poke the network wires (wire).
If from your modem only USB output, then you can not connect the modem to the console directly, only through the computer.
If you have a VPN, then you only or through a computer or through a router. Moreover, it is necessary to clarify whether the routers in your network will work at all (most likely they will, but not enough).
In principle, you can connect even if you only have a normal dial-up modem via a computer (the method is similar to what is described below), but does this make sense?
Let me remind you that you need to have an internet connection at home to get from the console to the Internet, there is no "free Internet" on the consoles. And the connection speed will be the same as your connection speed is paid for by the provider (otherwise they ask for anything).
To connect the console to the PC, you must have a free network card in the PC. For example, you have an Internet via a USB modem or there is no Internet at all, then one network card is enough, which you probably have (built-in motherboard). If you have one network card already occupied (for example, a cable from your Internet provider is inserted into it), then you need to buy a second network card (it costs 200-300 rubles).
Both consoles come with a power cord, and we use it.
Customize the PC. Decide which network connection in the network connections folder is responsible for the network card to which you will connect the console. You can rename this connection as you like, so as not to be confused in the future.
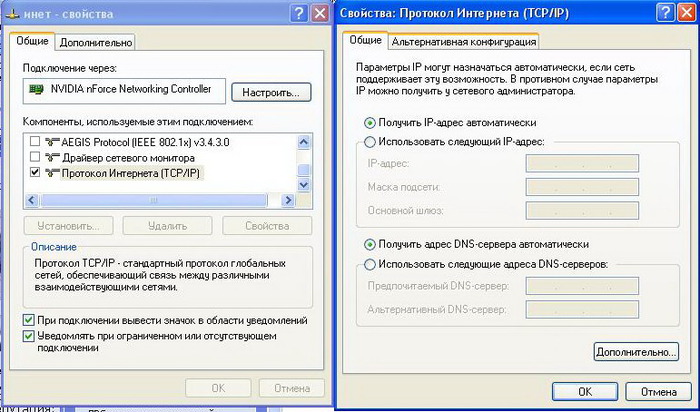
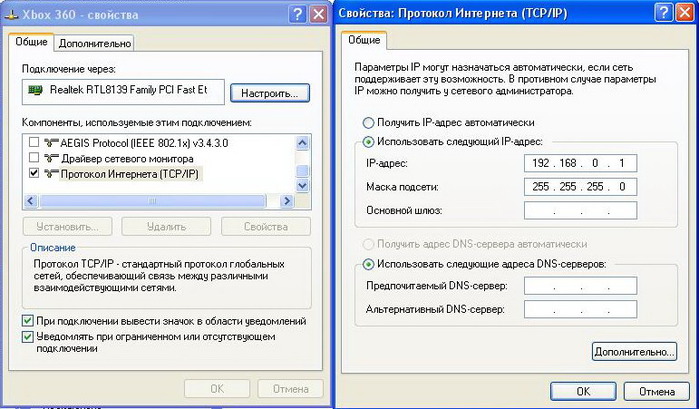
Go to the properties of this connection, select the TCP / IP protocol, properties, then you need to set the IP and subnet mask. IP = 192.168.0.1 (this is the IP and no other), mask 255.255.255.0. Everything. Do not touch anything else. All close.
Further, in the network settings of the console, you also need to set the IP handles and mask. The mask is the same, i.e. 255.255.255.0, and the IP should differ with the last digit (but not 1, because it is already in the PC and not more than 255), for example 192.168.0.10. It is also desirable to register the gateway 192.168.0.1 (i.e., the IP of the computer).
Everything, now in theory, your console is connected to computers and should establish a connection. Do not forget that if you want to access media files on your PC, you need to install a media server program on your computer. For example, this can Nero 7 or WMP (video media player) of the latest versions.
If you have a firewall installed, be sure to either disable it or allow access for external requests from the local network 192.168.0.xxx. Otherwise, the console simply will not reach the company.
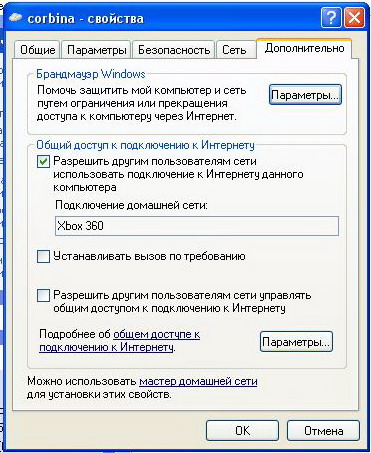
How to configure the Internet. If you do not have a VPN, then in the properties of the network connection that is responsible for the Internet, put a checkbox on the right tab “allow another user to use the Internet” and indicate the network connection of your console in the list. If you have a VPN, then do the same thing, but in the properties of the VPN connection.
If you have a router, then you don’t need to do anything at all. Just plug the wire into the router. It will display the network settings for your console. Buy a router is the easiest solution to this issue, because the router supports almost any Internet connection (except in rare cases when a special program is launched on the PC to access the Internet). But, the router cuts lokalki speed (about three times). Especially inexpensive router. In principle, for sure if you have a good lokalka (a la Corbin), you will have to tinker with the settings (for example, in order for the DC ++ program to work properly). Usually on the sites and forums of the provider there is a description of how to configure routers. Or call the support.
If during the connection test you get an error on IP - you have incorrectly configured the network computer prefix.
If you get an error on the DNS - badly shared Internet. Those. the console is connected to the computer, but not to the Internet.
If the error on the MTU (on the Xbox 360 is a common problem) - then I do not know how to help you. This is a real problem.
Example:
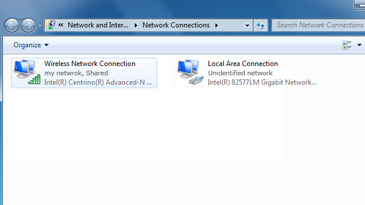
Here is the network connection folder. Corbina is a VPN connection:
Settings of the network card to which the Internet is connected (in my case everything is by default, but it is possible that your provider requires you to fill in the addresses with your hands, let it be as it is, it doesn’t matter what is written here):
Settings network card to which the console is connected:
This is how the Internet is shared, it’s not important whether it is done in a VPN connection (if you have a VPN like mine) or in the settings of the network card to which the Internet is connected:
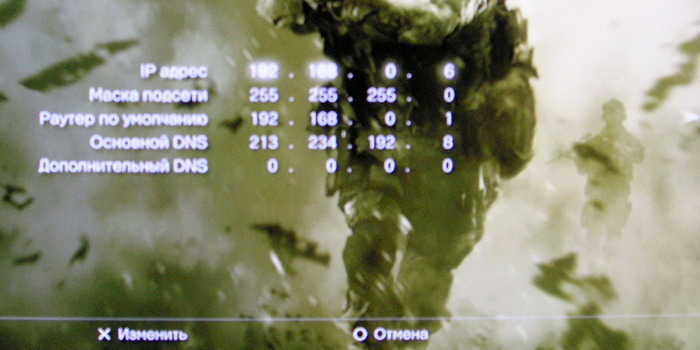
These settings should be in the console:
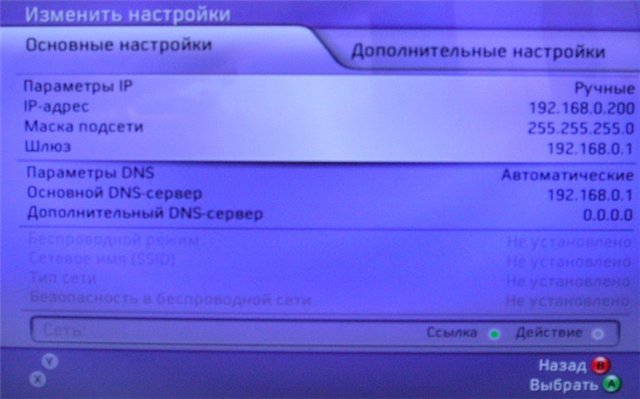
If you do everything correctly, you get an error on the DNS (I remind you that this setting was on the machine in the console), then you need to fill in the DNS addresses with handles. Where to get these addresses - read below.
PS3 customization features
In principle, all the same. Paragraphs setting in the console: Menu Network settings - Special - Wired - Manually configure - Automatic - Manually configure IP - then by points.
Here the feature is that you need to enter the DNS. Where to get it? On the computer in the lower right corner near the clock we find TVs responding to the Internet’s network connection (if there are no TVs, go to the connection properties and set the checkbox "When connected, display the icon ..."), click the left mouse button, click "Details" in the window that appears:
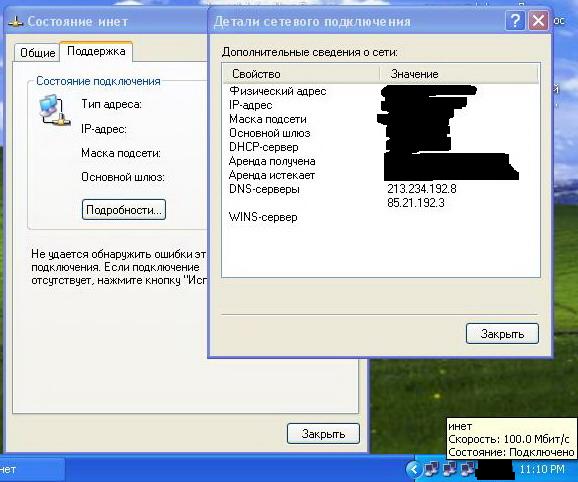
record both DNS and enter them in the settings of PS3:
Another way to find DNS addresses:
Start - Run - cmd - ipconfig / all
Look at the line "DNS server".
As a result, you should have an arrow to the right (before that it was not there). The default router is the IP of the computer, i.e. 192.168.0.1.
P.S. After you have set everything up and the output has taken place, you can even put all the settings on the machine in the console and still everything works. But the first time is likely to have to enter everything by hand.
If your provider determines by MAC address
If your authorization in the provider's network occurs only on the basis of the MAC address (it is also called "physical address"), i.e. you do not run anything extra on your PC when you log into the network and immediately have access to the Internet, then you can record this MAC address in the settings of your Xbox 360 and just as easily go online. Just remove the wire from the computer and plug it into the console.
Where to look at the MAC address is the same as the DNS (see just above). Where to drive it in the settings of the X360 is easy to find. Drive in without a dash, just a set of numbers and letters. All other network settings in the console should be the same as the network card settings in the PC. Minus the way - you need to constantly poke the wire, which is not very convenient.
Unfortunately in the PS3 can not change the MAC address and this method will not work.
You can use the shared Internet connection in windows system to share an Internet connection on a computer and an Xbox 360 console. With it, both the console and the computer will be connected to the Internet simultaneously.
To use Internet sharing, you need the following components:
Note. Most laptops have two network adapters: one for a wired connection, the other for a wireless one.
- USB modem that has at least one Ethernet connector
- Windows XP, Windows Vista, Windows 7 and Windows 8 (in the Windows 7 release, this function is not supported)
- Standard Ethernet cable.
Configure Internet Connection Sharing in Windows
- Press the button Start.
- In field Find programs and files enter ncpa.cpl and press enter.
AT Windows xp: press the button Startclick Run Open and click OK.
- Right-click the network connection for which you want to share, and then select Properties. A suitable network connection is the connection between the computer and the modem, and not between the computer and the Xbox 360 console.
- Select a button Allow other network users to use the Internet connection of this computer. and click OK.
- Wait for the network connection status to change to open. shared.
|
|
- Launch your web browser and try to connect to the Internet. If you are unable to connect to the Internet, make sure that in step 3 you have shared access to the main Internet connection.
- Connect one end of the Ethernet cable to the network port on the computer. Connect the other end of the network cable to the back of your Xbox 360 console.
- Automatically.
Note. When connected to wireless network or if PPPoE settings are specified, remember, you may need to enter them later.- Press the start button Guide Settings and select System settings.
- Select Network settings.
- Wired network.
- Click the tab Additional settings.
- Choose.
- Check your Xbox Live connection. To do this, follow these steps.
- Press the start button Guide on the gamepad, open the section Settings and select System settings.
- Select Network settings.
- When prompted, select Wired network.
- Select an item.
Troubleshoot Internet Sharing Issues
Solution 1: Make sure Windows Internet Connection Sharing is set up correctly
If the Access tab or the option Allow other network users to use the Internet connection of this computer (in Windows XP) does not appear, the following reasons are possible:
- There are no two network adapters in the computer. To solve this problem, install a second network adapter in the computer, or make sure that the existing network adapters are working correctly.
- You may be trying to share the wrong network connection. To resolve this issue, repeat only step 3 and select another network connection.
Solution 2: Manually enter the IP settings on the console.
If one of the following error messages appears, follow these steps:
Unable to get the IP address from the router or modem.
The DNS server cannot resolve Xbox Live server names.
- Press the start button Guide on the gamepad, open the section Settings and select System settings.
- Select Network settings.
- When prompted, select Wired network.
- Select Configure network.
- Tab basic settings select IP parameters.
- Select Manually and click IP address.
- Enter 192.168.0.2 and click Is done.
- Select Subnet maskenter 255.255.255.0 and click Is done.
- Select Gatewayenter 192.168.0.1 and click Is done.
- Tab basic settings select DNS options.
- Select Manually.
- Select Primary DNS Server.
- Enter 192.168.0.1 and click Is done.
- Press the button again. Is done.
- Press the button B on the gamepad and select Check Xbox Live connectivity.
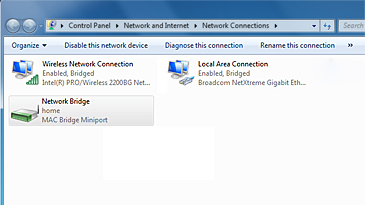
Creating a network bridge
If you have a laptop equipped with two network adapters, one for wired and one for wireless, you can use it to connect your Xbox 360 console to Xbox Live. This type of connection is called a network bridge. .
This is a simple and fast connection, but it will not be possible to use the Internet on a laptop when it is connected to an Xbox 360 console.
To use a network bridge, you need the following components:
- Computer with two network adapters
- Windows XP, Windows Vista, Windows 7 or Windows 8.
Note. In the release of Windows 7 Initial, this feature is not supported. - High Speed Internet Access
- Standard Ethernet cable.
Network Bridge Setup
- Press the button Start.
- In field Find programs and files Type ncpa.cpl, and then press ENTER.
Windows xp: Click the button Startthen Runtype ncpa.cpl in the field Open and click OK.
- Select the two network connections between which the bridge will be created. To do this, left-click the first network connection, press and hold the CTRL key, then left-click the second network connection.
- Connect one end of the Ethernet cable to the network port on the laptop. Connect the other end of the network cable to the back of your Xbox 360 console.
- Make sure the Xbox 360 console has all network settings set to Automatically.
You can do this as follows. - Press the start button Guide on the gamepad, open the section Settings and select System settings.
- Select Network settings.
- When prompted, select Wired network.
- Click the tab Additional settings.
- Select Restore Defaults.
- Check your Xbox Live connection. You can do this as follows.
- Press the start button Guide on the gamepad, open the section Settings and select System settings.
- Select Network settings.
- When prompted, select Wired network.
- Select item Check Xbox Live connectivity.
Note. If you are connected to a wireless network or if PPPoE settings are specified, remember them, you may have to enter them later.