How to connect the com connector on the motherboard. How to choose a power supply for a computer
The power supply is one of the main elements of the system unit, which supplies all computer components with electricity. If it does not work, the computer simply does not start. Connecting the PSU is not the most difficult task, however, there are some subtleties here that will be useful for every PC user to know. Let's see how to connect the power supply so that all devices work correctly.
General information
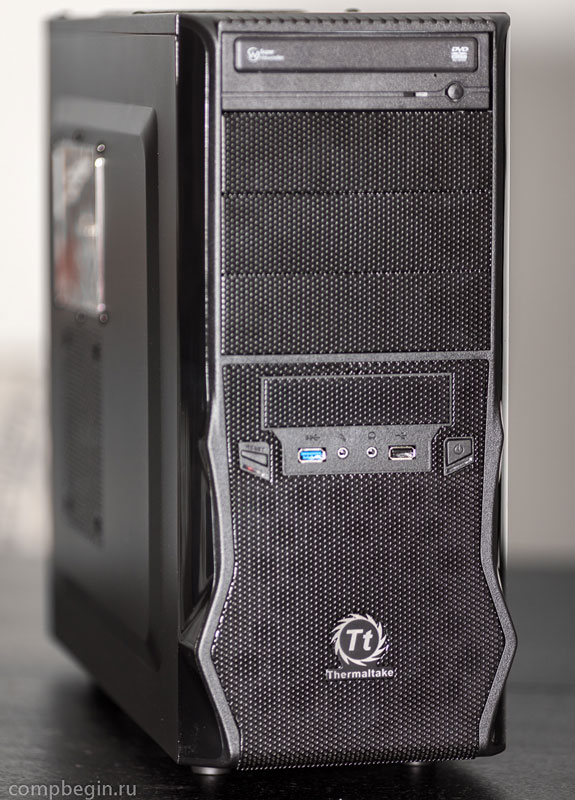
If you connected system unit independently, you have already encountered the power supply unit - it was to it that you connected the wire that goes from the system unit to the network. Now it's time to get to know this device from the inside.
Be attentive to the purchase of BP. Read in advance how to choose it correctly or consult with more experienced users not to purchase equipment that does not fit you in power. An improperly selected power supply unit may cause damage to the equipment connected to it.
The power supply is a steel box, which is usually installed in the upper part of the system housing. The main difficulty in connecting it is a large number of wires with a different interface. Looking at this accumulation of cables, you involuntarily begin to doubt your abilities. However, this is a needless concern - in fact, everything is extremely simple. Virtually every wire for something is used: for example, to connect the drive. 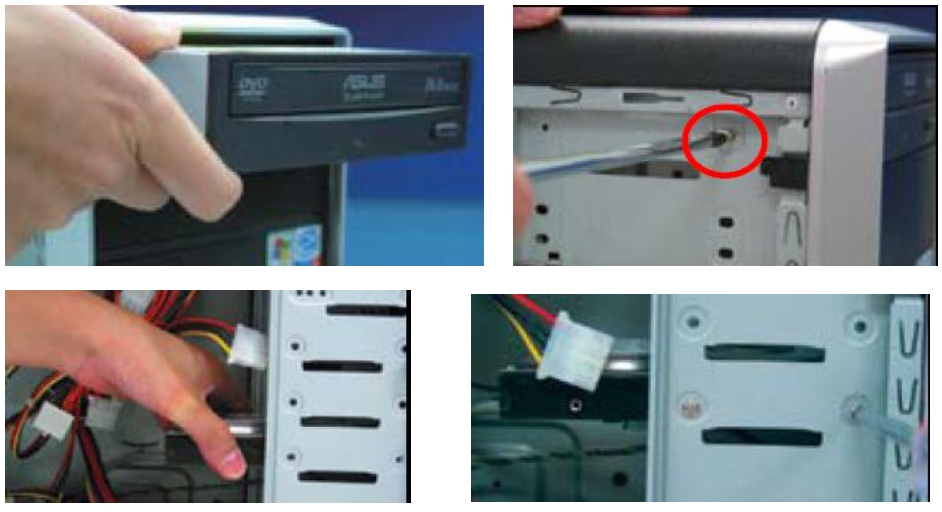 However, if you have at least devices installed (one drive, one hDD), some cables will remain free. This is absolutely normal. It is only important to fix the free wires so that they do not accidentally fall into a working cooler.
Disconnect
The first step is to disconnect the old power supply.
Attention! Completely de-energize the computer before opening the system unit!
Remove the cable from the old power supply to the electrical network. 
Remove the side covers on both sides to make it easier to work.
Disconnect all connected equipment from the old power supply. It is advisable to remember which wire to connect to.
Remove the old power supply. It is mounted on four screws that can be found on the rear panel of the system unit.
Carefully loosen the screws and remove the steel box. 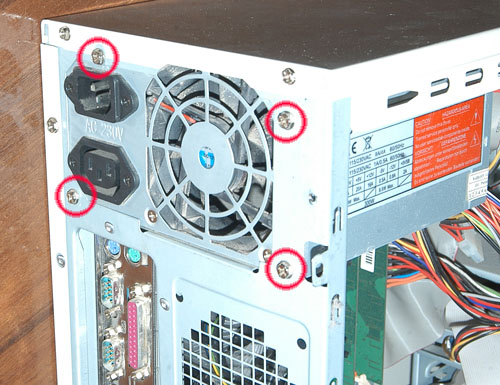
Connection
The connection procedure differs from dismantling only in the order of actions. First, the new power supply unit must be installed in its rightful place and secured with four screws.
Attention! Install the power supply very carefully: make sure that its sharp corners do not accidentally scratch the motherboard or other equipment.
BP is installed - now you can connect it to motherboard, connect the hard drive, optical drive and other equipment. This is the most important step, the success of which depends on the performance of your computer. So, let's begin:
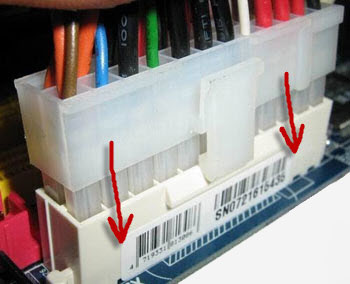
The motherboard power supply is the largest connector and consists of two plugs (a total of 24 contacts). 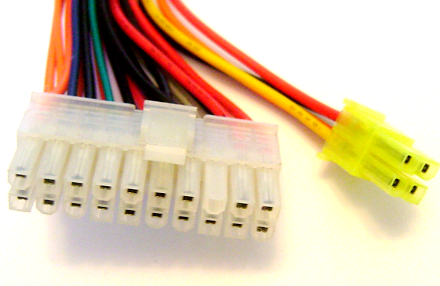 Check which side should install the connector - it has a well-defined orientation. Insert both plugs and push them in until they click.
Power processor - consists of four or six contacts. The port is located near the cooler, under which is the processor itself. 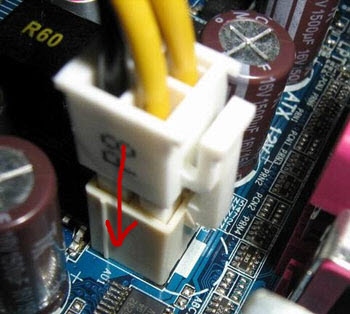 Power hard drives and optical drive - can be SATA or Molex, depending on the hardware model used. Modern drives use the SATA interface:
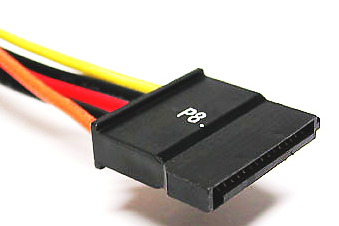
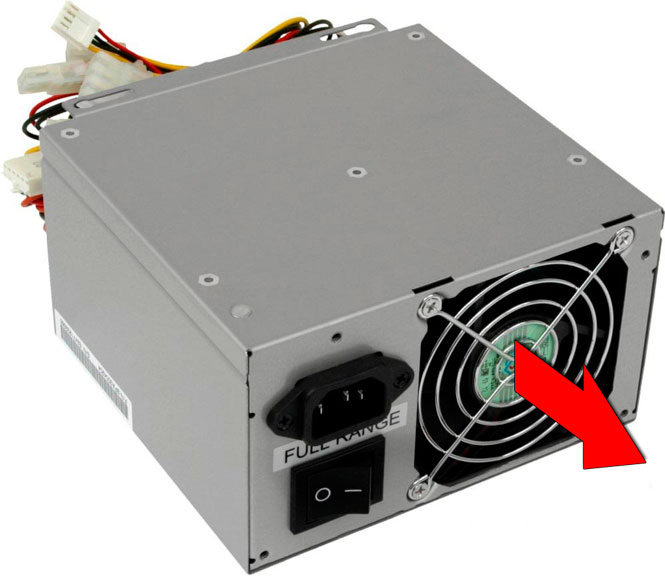
Block replacement aTH supply It is usually required in two cases: 1 - if existing for some reason has failed; 2 - You installed new equipment in your system, for example, a pair of gaming graphics cards, and the old 400 W unit can no longer provide power to all devices due to insufficient output power. how replace ATX power supply You yourself will learn from the instructions given. From the tools need only Phillips screwdriver. If there is no such one, then the “flat” one will do.
We will assume that you have already acquired a new power supply unit and are now ready to produce replacement. First of all de-energize the computer - pull out the power cord (220 V) from power supply. Next, remove the left (usually the left, if you look at the computer from the front) wall of the system unit, unscrewing a pair of screws from the back of the case. The following thing can be terrified by the amount of accumulated dust and gently remove it with a vacuum cleaner. Pro on the site already have some information. If all the ventilation holes have a dust filter and everything inside the PC is clean (or you have already cleaned everything), then you can move on.
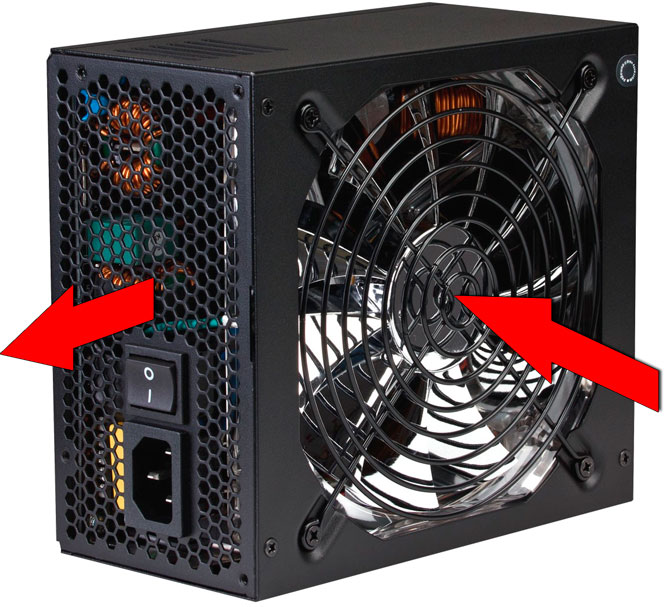
Modern aTX power supply has many pins for supplying electrical energy to all components of the system unit: a motherboard with a processor and memory, a video card, hard drives, etc. In general, all wires that come from the PSU (power supply unit = power supply unit) must be disconnected from the connected devices. In no case can not "loosen" tightly seated connectors perpendicular to the plane placing the contacts in them. I think that you were taught as a child when you needed to hold the plugs themselves, not the wire.
Some connectors (on motherboard, video adapters with additional power) have special latcheswhich prevent the connection from being disconnected from vibrations. To disable such "tricky" connectors - you need to push on the free end of the latch, so that the hook goes out from under the mate and you can disconnect the wire with the usual movement aTX power supply. The photo shows the 20 + 4 connector "ATX Power" and circled the place of pressing to remove the plug.
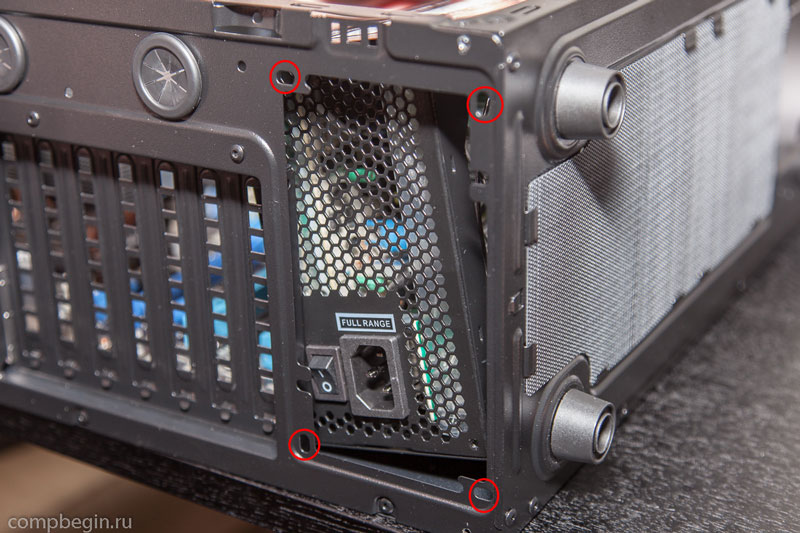
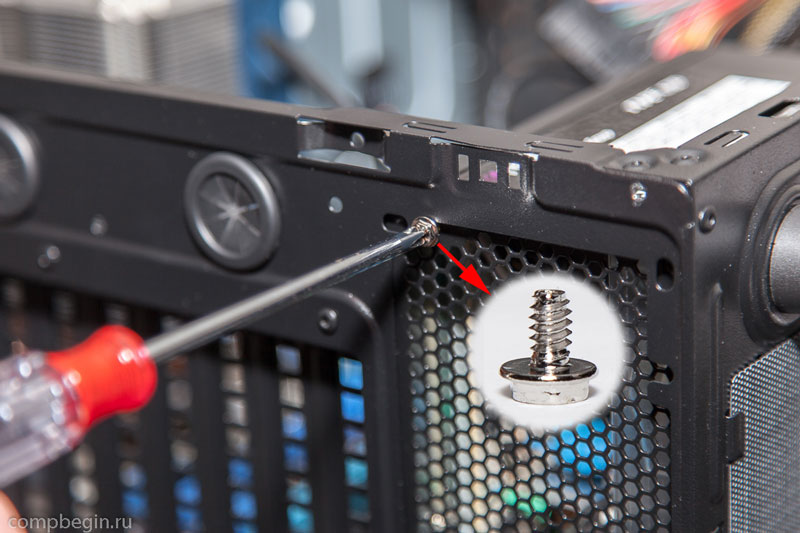
After all the wires are disconnected, all that remains is to remove the old power supply unit by unscrewing the 4 screws that secure it to the back wall of the system unit. Take care to power Supply after unscrewing the last screw did not fall down (when it was placed at the top) - hold it with your hand or turn the system unit properly.
On this, in general, that's all. To to establish new unit ATH supply, perform the operations to remove the power supply unit in the reverse order: insert the new unit into the body and fasten it with 4 screws. If the new PSU and PC case do not match the holes, then simply flip the new PSU - the holes on all ATX models of the format should be located in accordance with a single standard. After that, connect the power supply of the motherboard (the “ATX_Power” connector and the additional power supply of 12 V), hard disks and video cards. Personally, I usually perform their connection in this order in order to avoid the need to climb to the motherboard itself through the thorns of wires from the graphics card and HDD or optical drive drives.
In the event that you decide to install a new, more powerful power source in your computer, then do not rush to part with the old one. It can be used, for example, to power LED lights. As we have already seen in one of the rather popular articles on the site. There is also a full pinout ATX connector. Permissible currents for different power lines, see the sticker on the power supply itself or in its documentation.
In the third and final part of the manual for self-assembly of a PC, you will learn about the types of power supplies, their installation and connecting computer parts to them. We will also talk about the installation of a discrete video card and other expansion cards.
Having finished with the connection of the first portion of cables, we proceed to the next important step - installation and connection of the power supply unit (PSU). But before starting this procedure, we will pay attention to some particulars that may affect your choice of components when purchasing, of course, if you have not done so yet.
Types of power supplies
In some cases, the power supply may already be installed in the case at the factory, so you do not have to do it yourself. However, in our opinion, it is better to buy these two components separately. Thus, it is much easier to choose a case with the design and arrangement of internal elements that is suitable for you, as well as choose a power supply unit with the optimal power for your future system.
In our case, the power supply will be located in the lower part of the case, under the motherboard. This is now the most popular layout, although more recently, in most cases, its place was on top. What is the reason for such changes?
Previously, to cool the internal components of power supplies of low and medium power, a fan was used, located in its rear part.
His task was to blow hot air out from inside the PSU. This method of cooling can still be found on some cheap low-power power supplies.
In modern power supplies (especially with high power), a more efficient method is used to cool its internal components. Now the fan is placed in the bottom wall of the unit and blows air inside.
The output of the hot air flow is naturally carried out through the holes, which are located on the rear wall, where the blowing fan was previously located.
In the case when the power supply unit is located at the top, the air for blowing occurs from the area located directly above the processor cooling system. At the time of peak loads on the CPU, the air here can be very hot, which reduces the cooling efficiency of the power supply elements, and can lead to overheating.
If the power supply is located at the bottom, then the air intake occurs from under the bottom of the case. Here, the temperature of the air masses is almost independent of the operating modes of the computer, which ensures the normal mode of cooling of the components of the unit even with a strong computational load on the PC.
Another nuance you can come across is power supply units with modular cable layout. In them, most of the wires for powering computer components are not sealed inside the unit at the factory, but are connected as required via special connectors. The exception is the cables responsible for the supply of current to the motherboard and the central processor, which always remain non-removable.
The benefits of modular layout are obvious. You have the opportunity to connect only the number of cables, which will be enough to power the components installed at the moment, thereby reducing the number of wires inside the case. In turn, this contributes to better air circulation and improved cooling of PC components, which increases the life of their operation, and also has a positive effect on the stability of the computer.
Let's return to the assembly. Even if you assemble a computer for the first time, it will not be difficult to find a place to install a power supply.
Look at the back of the case. From above or below you will see a large rectangular neckline. In its corners there are four holes that serve to fasten the PSU with large-thread screws.
When orienting the power supply inside the case, remember that the cooling fan must be located on the bottom.
Connecting devices to the power supply
After installing the power supply, we will connect the wires to the motherboard and devices. First, find the thickest cable responsible for supplying power to the motherboard. It ends with a large 24-pin connector.
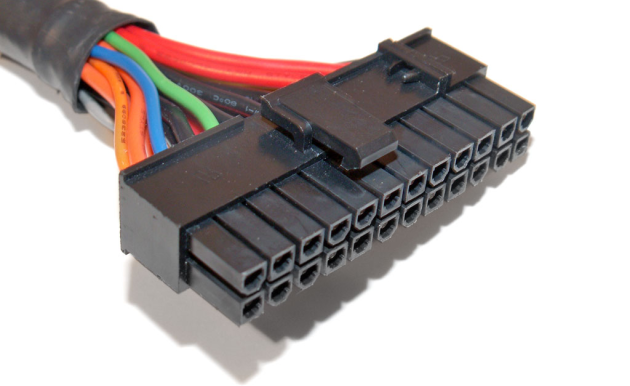
Often this connector is divided into two parts (20-pin + 4-pin) to be compatible with older motherboards that have a 20-pin power connector.
Find the connector for connecting this cable on the motherboard is not difficult due to its size. Most often it is located next to the RAM slots along the right edge of the board. To exclude the possibility of improper connection, some contacts on the connectors have beveled corners, and on its right wall there is a notch for a latch.
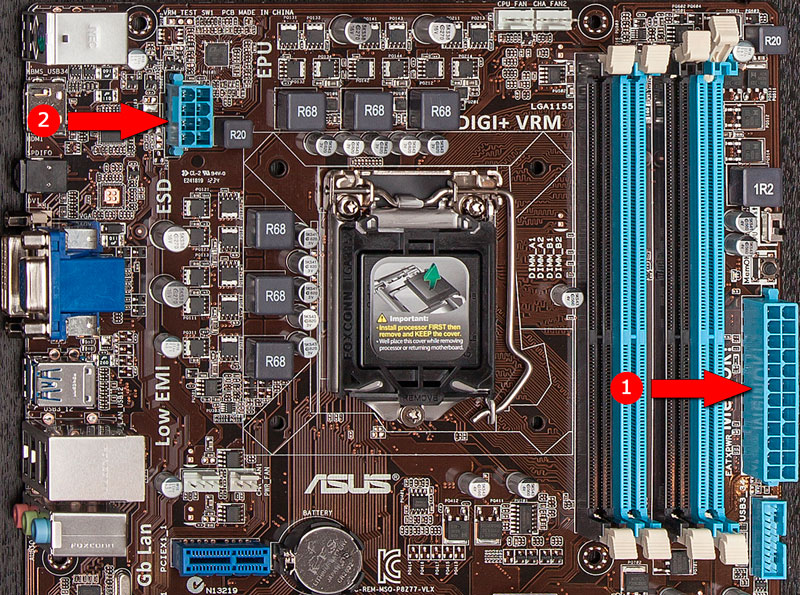
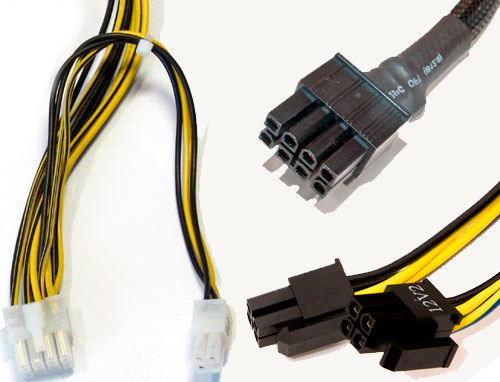
The second cable that we need to connect to the motherboard will be the power of the processor. In our case, we are dealing with an 8-pin connector, but in many cases it can only have four contacts. That is why, on the cable coming from the power supply, the connector can be not only monolithic, but also divided into two parts, each of which contains four contacts.
On the system board, the processor power supply connector is usually located near the CPU, just above its left corner. As in the case of the connector for the main power supply of the motherboard, there is also a system of protection against improper connection in the form of bevelled corners on the contacts and a notch for a latch.
Note that some power supplies, especially cheap and low-power ones, have only one 4-pin power connector for the processor. In this case, the motherboard with an 8-pin connector will not work. So be careful when choosing a BP.
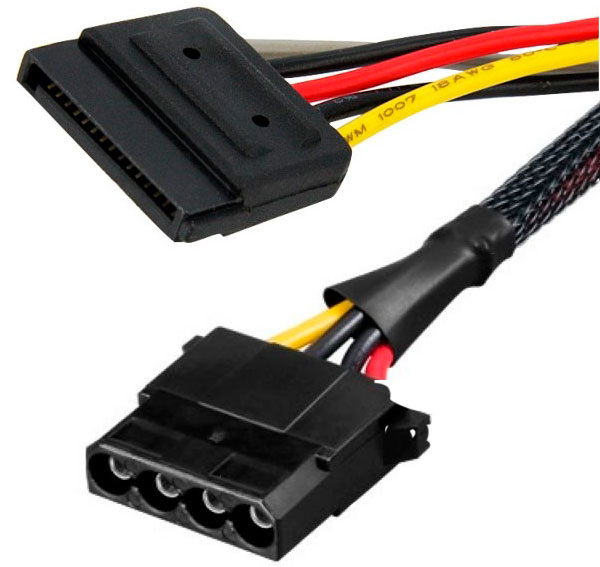
In rare cases, you may need another type of connector - Molex (in the photo below). Mostly they were used in older models of optical drives and hard drives and are practically not used in modern devices. Also in this type of connectors, power can be connected to the in-shell fans and the housing backlight.
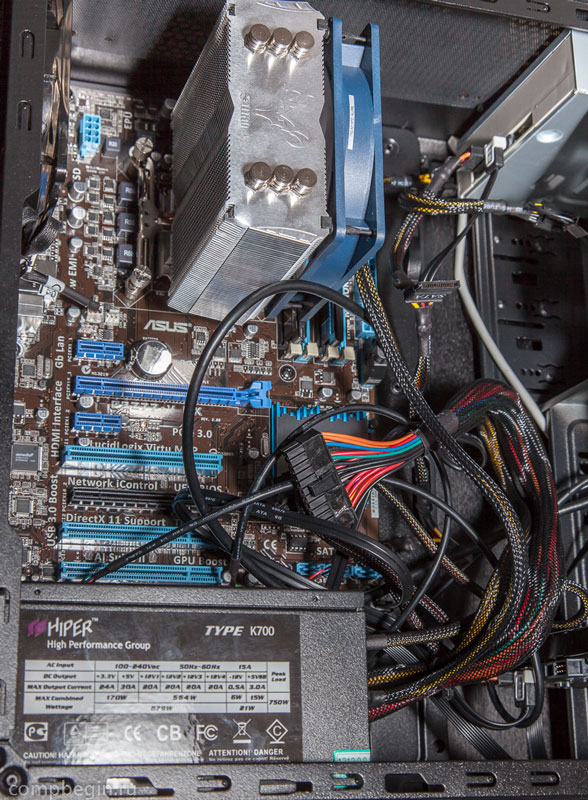
Connecting all the necessary power connectors, it's time to pay attention to the laying of cables. If possible, the wires should not hang over the motherboard. Lay them carefully along the contour of the motherboard so that they do not interfere with the circulation of air flow inside the case, providing a normal cooling mode for computer parts. Tie too long wires to the elements of the case with twists or clamps. Also, many modern enclosures have special clips that can be a good help for proper cable placement.
Many novice collectors do not pay enough attention to the procedure of laying wires and do it completely in vain. After all, good air circulation inside the case is the key to effective cooling of components, which prolongs their service life and ensures uninterrupted computer operation. Moreover, uncleared wires can get into the fan blades or impede access to some connectors and parts of a PC, which may further complicate the repair or upgrade process.
Installing a video card and other expansion cards
Having dealt with the already connected cables, go to the final step of our assembly - installation additional fees Extensions, among which may be graphics cards, sound and network cards, TV tuners and all kinds of controllers. These devices, which are different in their orientation, combine one thing - all of them are designed to expand the functionality (configuration) of a computer and are installed in special connectors, which are called “expansion slots”.
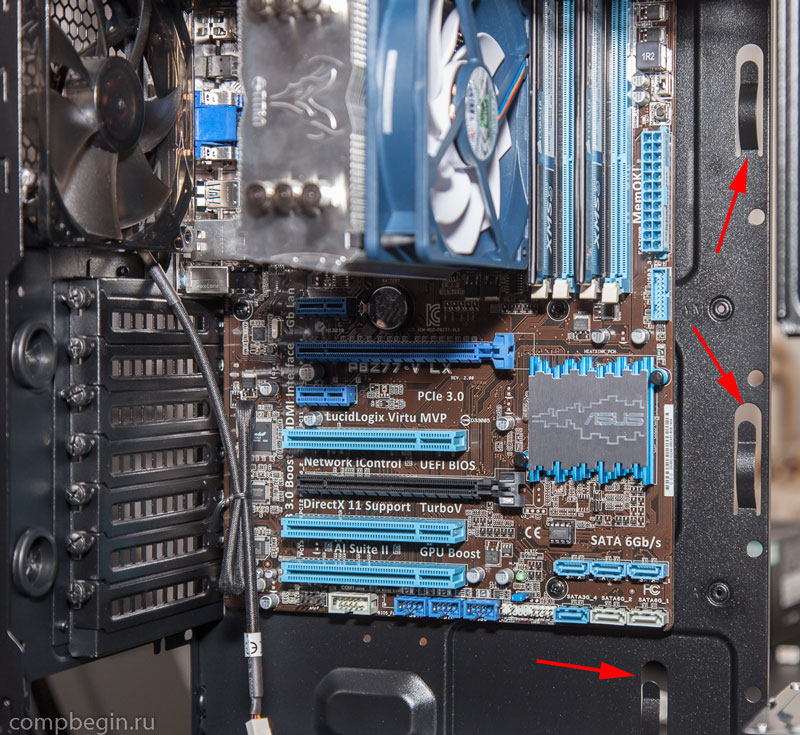
Expansion slots are located under the processor socket, closer to the back wall of the case, where a number of rectangular cut-outs are made to output the connectors of the expansion cards. All of them were originally plugged with metal straps.
To date, three types of connectors, named for computer buses, which include them, are unsoldered to mainboards.
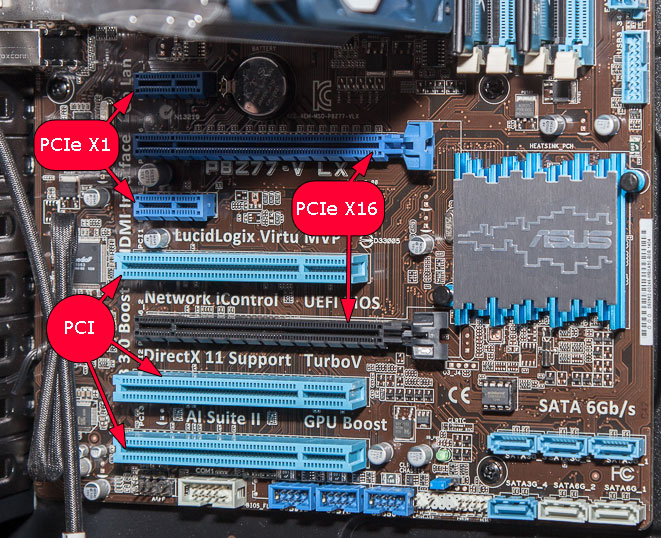
Tire PCI - The oldest of the currently existing I / O tires, the first version of which appeared back in 1992. Uses parallel data transfer method. Today, it is actively being supplanted by more high-speed modern interfaces PCI Express and USB. Nevertheless, many sound and Wi-Fi cards, TV tuners and controllers are still installed in these slots.
Note that some modern motherboards (especially of the Hi-End class) may not have these connectors at all. So if you plan to install PCI devices on your computer, be careful. In our case, we have as many as three PCI slots that are colored blue.
Tire PCI Express ( PCI- E or PCIe) X1 - high-speed bus using one serial line for data transfer. As well as the PCI bus, it is designed to install a variety of internal peripherals, among which there can be various controllers, sound cards, Wi-Fi adapters and other, but at the same time its connector is much smaller. On our motherboard, these slots are blue and soldered in the amount of two pieces.
Tire PCI Express ( PCI- E or PCIe) X16 - high-speed bus capable of using data transmission 16 bidirectional serial lines. The duplex bandwidth of the X16 connection is 32 Gb / s in the case of the PCIe 2.0 bus version, and 64 Gb / s in the PCIe 3.0 version.
PCI Express X16 slots are designed primarily for the installation of modern video cards. At the same time, on one motherboard, their number can vary from one to four, which makes it possible to use the total computational capacity of several graphics adapters in one application.
Here we come to the last component, which is left for us to install in the system unit, which is the video card. However, it is worth noting that the installation of a separate (discrete) video adapter is not always necessary, since most modern processors have an integrated graphics core. But if you are an avid fan of modern computer games and other multimedia entertainment, you cannot do without a good graphic adapter.
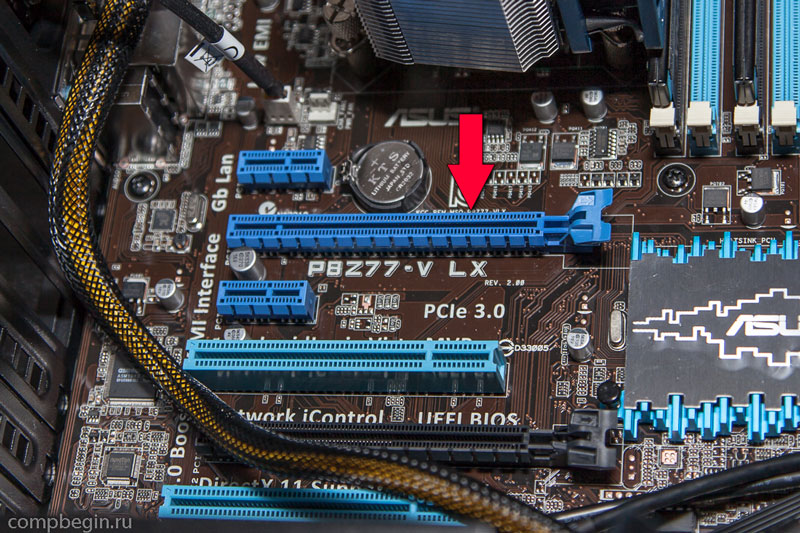
As mentioned above, all modern video cards are installed in PCIe X16 slots. On our motherboard, we can observe two such connectors, one of which is colored blue and the other black. In a situation where there are several PCIe X16 slots on the motherboard, to always place a single video card, choose the top one, which is closer to the processor radiator, since it is the main one.
Immediately before installing the graphics card, look at it from the end (where the monitor connectors are located) to understand how many plugs placed on the back of the case need to be removed. As a rule, for budget and mid-price cards it is enough to remove one bar, since they most often have a one-slot cooling system. But powerful video adapters are equipped with a more overall cooling system, which occupies two slots at once, and they require, respectively, the removal of two plugs.
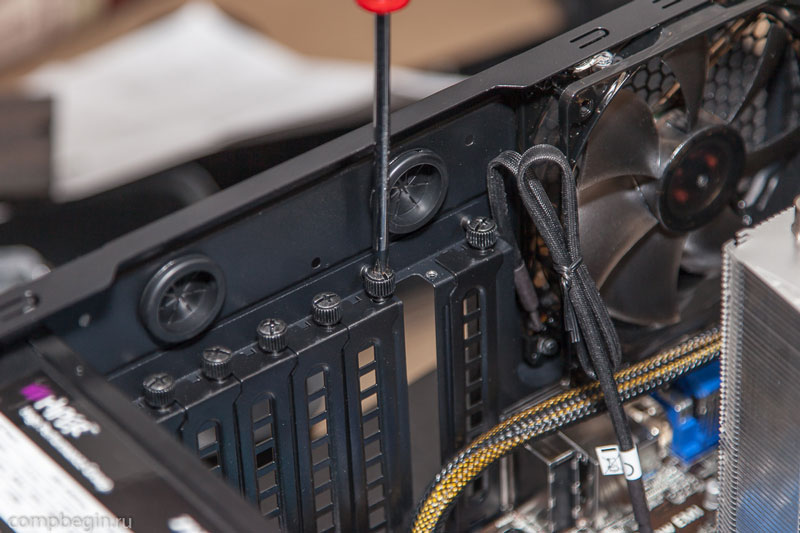
After removing the plugs, we take the video card and with the help of careful pressing, insert it into the slot until the characteristic click of the lock located on the connector. It secures one end of the adapter, preventing it from “falling out” of the connector under its own weight.
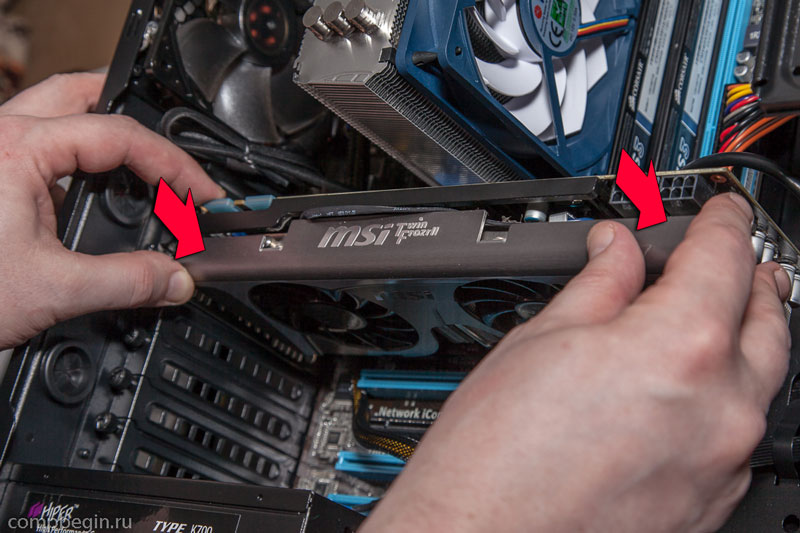
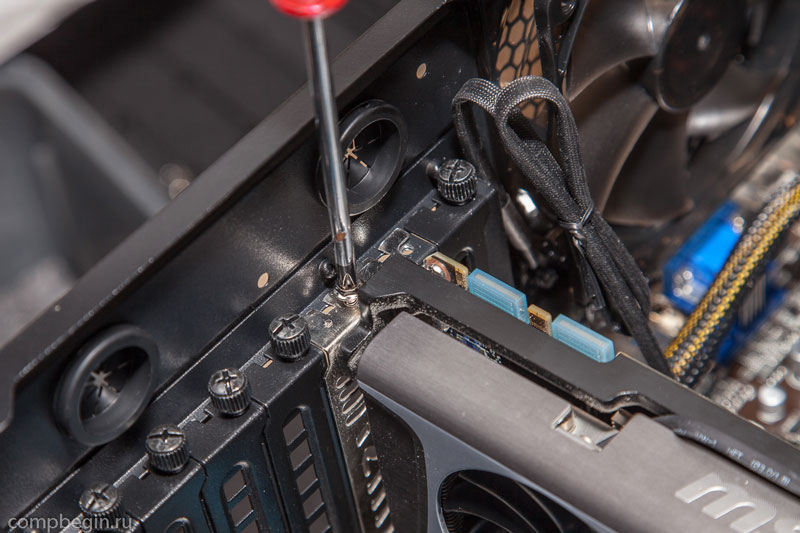
The other end of the board is fastened with screws with a large thread to the back of the case.
Modern video cards, in fact, are a small minicomputer that has its own graphics processor (or even two) and video memory. A powerful computing system requires a lot of energy, so many graphics adapters are equipped with additional one or two power connectors. At the same time, the number of contacts inside them ranges from six to eight.
There are power circuits with one 6-pin connector, two 6-pin connectors, one 6-pin connector and one 8-pin connector, as well as two 8-pin connectors. Be sure to consider this when choosing a power supply. Far from each unit has separate cables for additional video adapter power, especially with 8-pin connectors.
In our example, we are dealing with a video card that has one 6-pin and one 8-pin connector.

In this case, note that the connectors from the power supply have a modular layout and consist of two parts, one of which contains six contacts, and the other two. The latter is not involved in the 6-pin connectors.
Conclusion
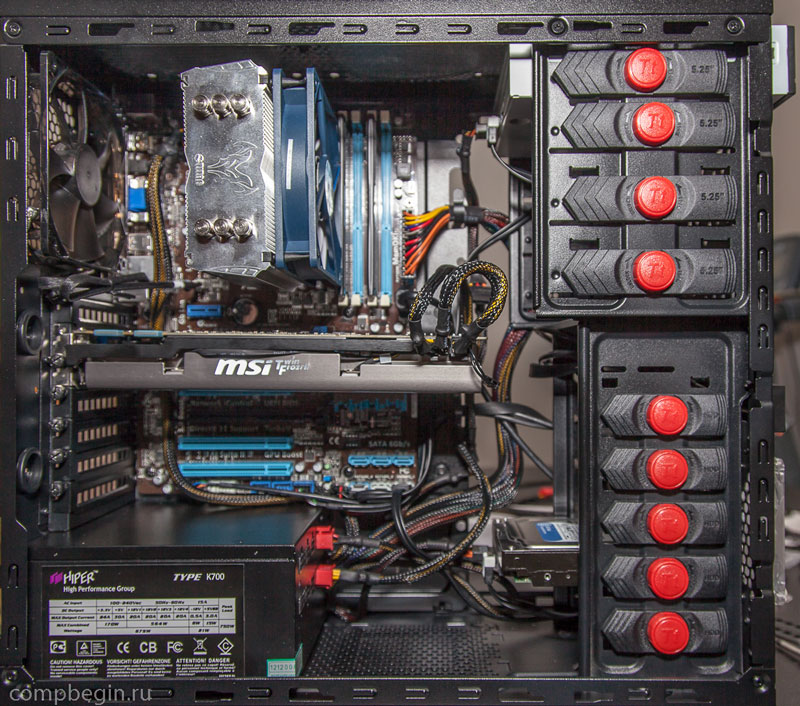
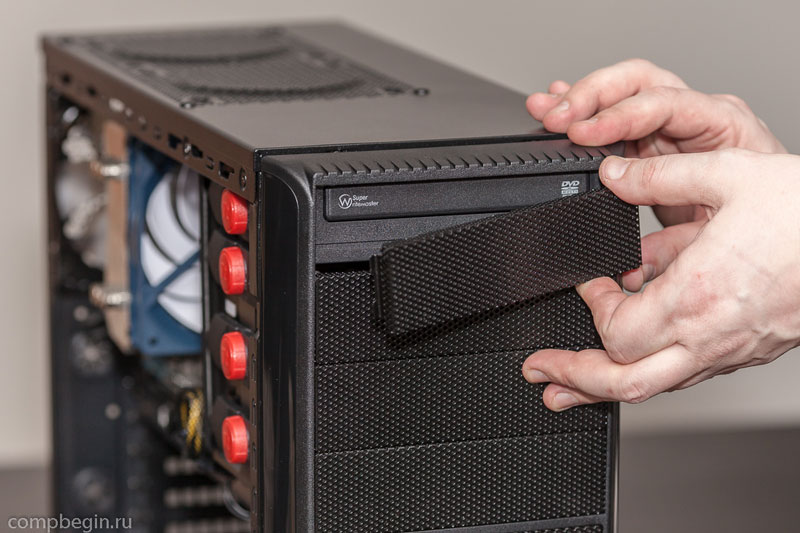
At this installation of components inside the case can be considered complete. It remains only to replace the front panel and side covers.
Before installing the front panel, do not forget to remove the plugs from it in those places where you have devices installed in external compartments, such as optical drives, drives, card readers and others.
That's all. Our system unit is fully assembled and ready to go.
Now, knowing how and where the various components of the computer are installed, you can, at any time, make a replacement, break down parts, or upgrade a PC.