Connection and configuration of TP-Link TL-WR841ND with Russian interface.
Hello, dear friends. In this article, we will talk about how to quickly and easily configure the TP-Link TL-WR841ND router. This model is very easy to configure and use.
Using the QSS function, which this router is equipped with, you can quickly configure secure Wi-Fi.
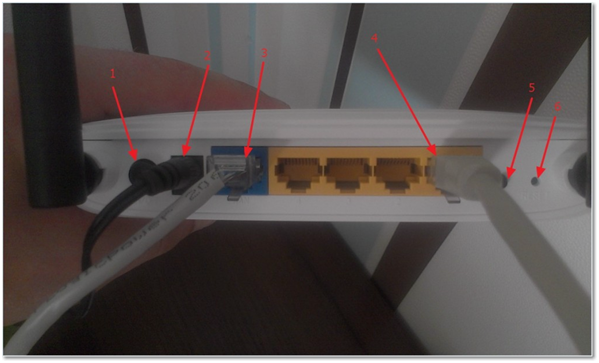
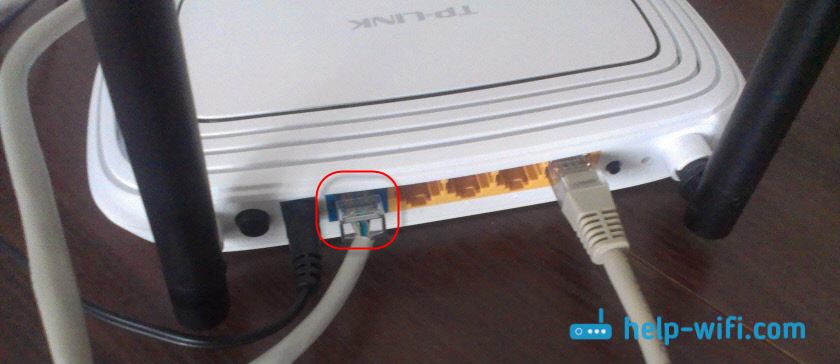
 All the connectors of this router are behind the device: a power socket, a Reset button for resetting the settings, a QSS button for turning on a secure Wi-Fi connection, 2 antenna connectors and a button for turning on / off a router.
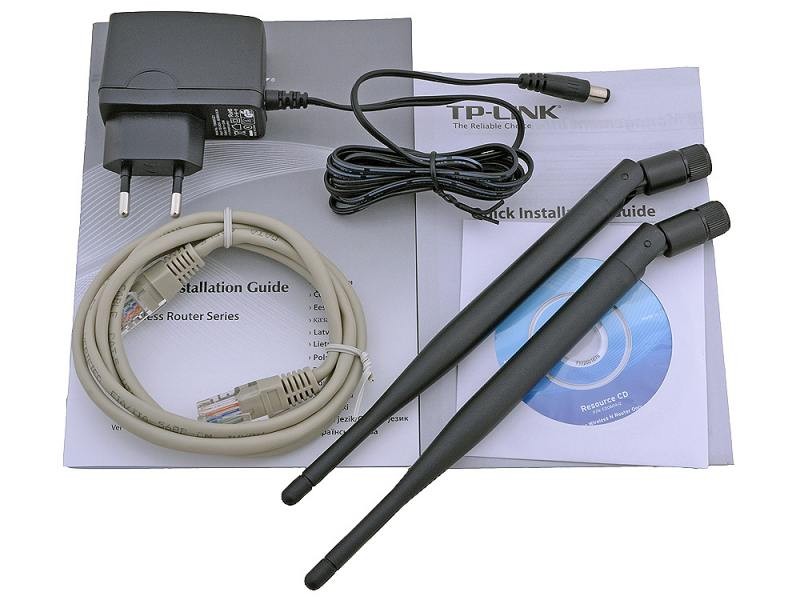
The device package includes:
- the device itself;
- power adapter;
- 2 removable Wi-Fi antennas;
- Ethernet cable;
- cD with software;
Step 1. Connect our router: we insert the ISP's wire into the blue port. We insert one end of the patch cord into one of the yellow ports, and the other end into the network card of a computer or laptop. Plug the power supply into an outlet. Then turn on the router.
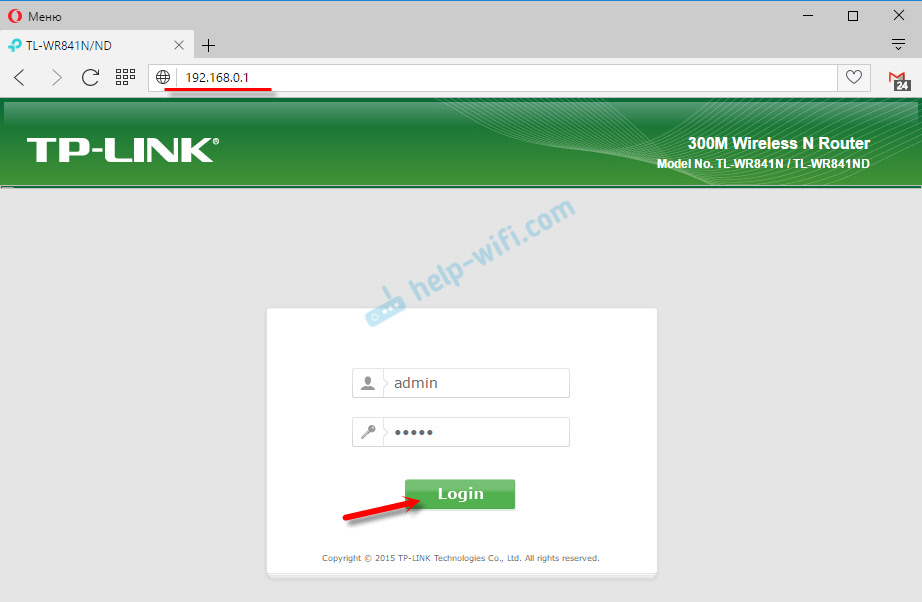
Step 2. In order to enter the TP-Link TL-WR841ND router settings web-interface, you need to enter:
- 192.168.1.1 (if the firmware is 100325v5);
- 192.168.0.1 (if the firmware is 120522v8, 130626v9);

Default username and password: admin / admin;
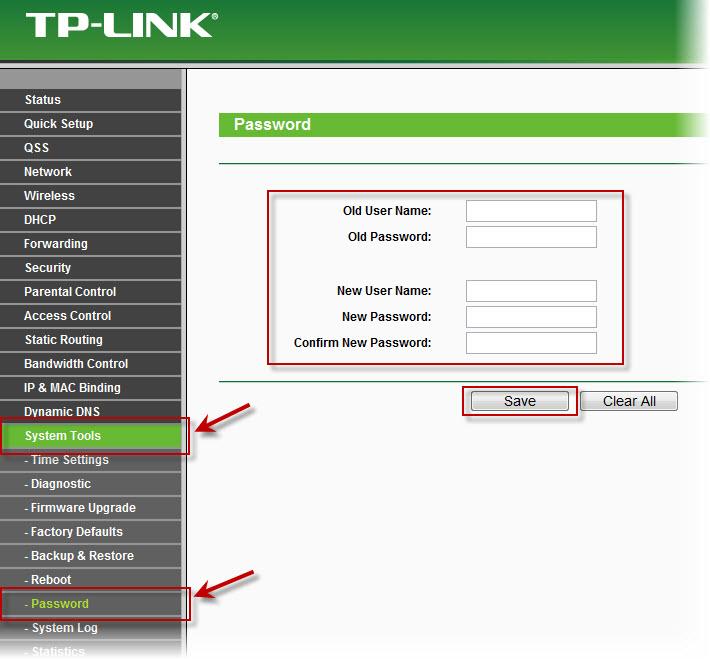
Step 3. We get to the settings window, where you can start by changing the login and password to enter the settings. To do this, go to the tab System Tools - Password. We save.
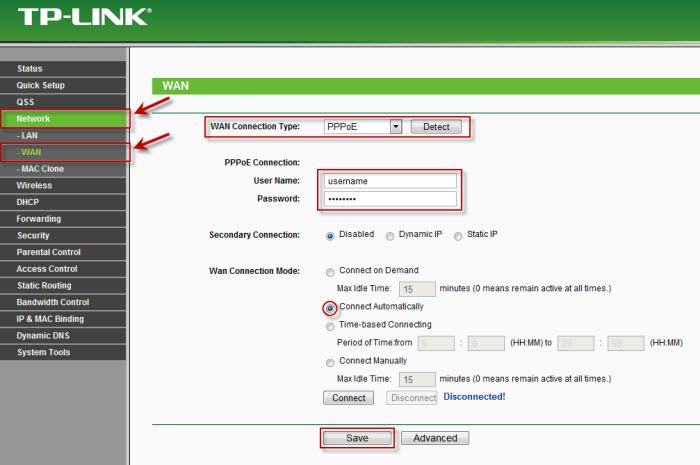
Step 3. Setting up the Internet on the router: Go to the NetWork / Network tab and select the WAN
1. PPPoE Connection Setup
This type of connection is used by most Internet providers, for example, Dom.ru, MTS, Ttk, Rostelecom. We select from the list PPPoE, enter the login and password in accordance with the agreement, then we install the automatic connection and Save.
2 Setting up a PPtP connection when automatically obtaining a local IP address
We perform almost the same actions, we only set the period on Dynamic IP and Server IP Address / Name —ppp.lan

3 Configuring a PPtP connection with a static local IP address
Specify the IP address, gateway, DNS server address and subnet mask, as in the contract.

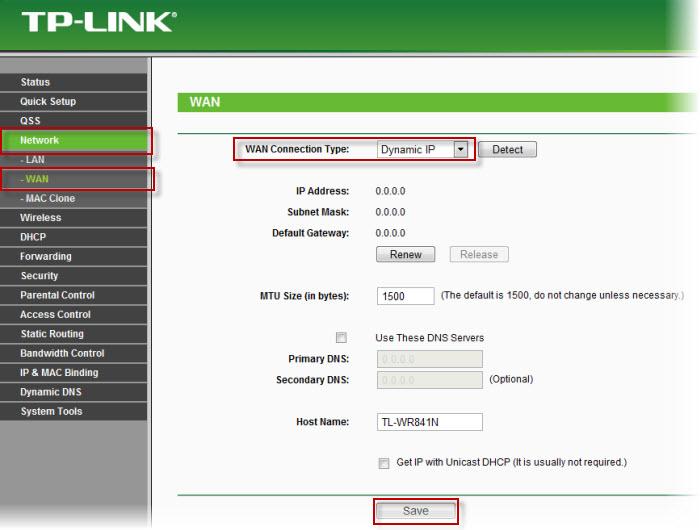
4 Configuring Dynamic IP
This method is the simplest and is used, for example, in Rostelecom Udmurtia. We set the type of connection Dynamic IP and save, the rest is left as is.
If you do not know the type of connection, then you need to call and ask your provider.
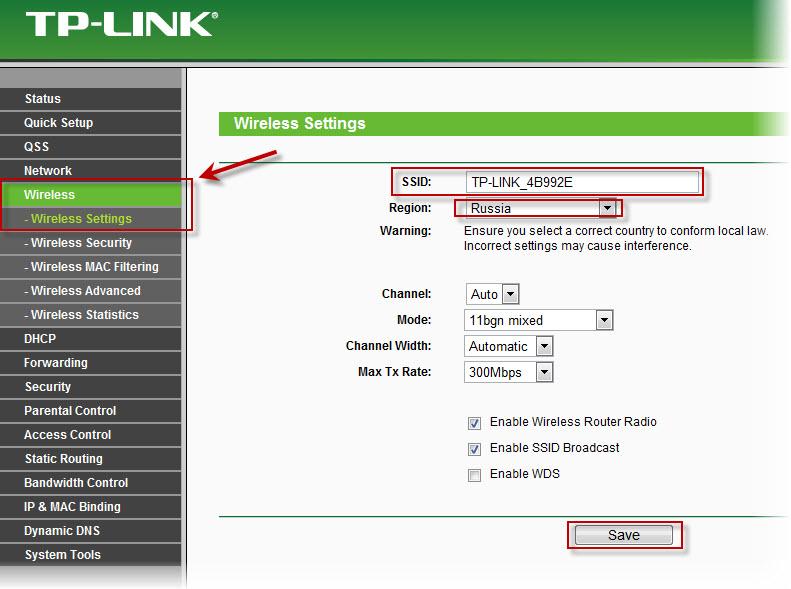
Step 4. Setting up Wi-Fi. Select the tab Wireless / Wireless - Wireless Setting. In the SSID field enter the name of the network, then your region and save.
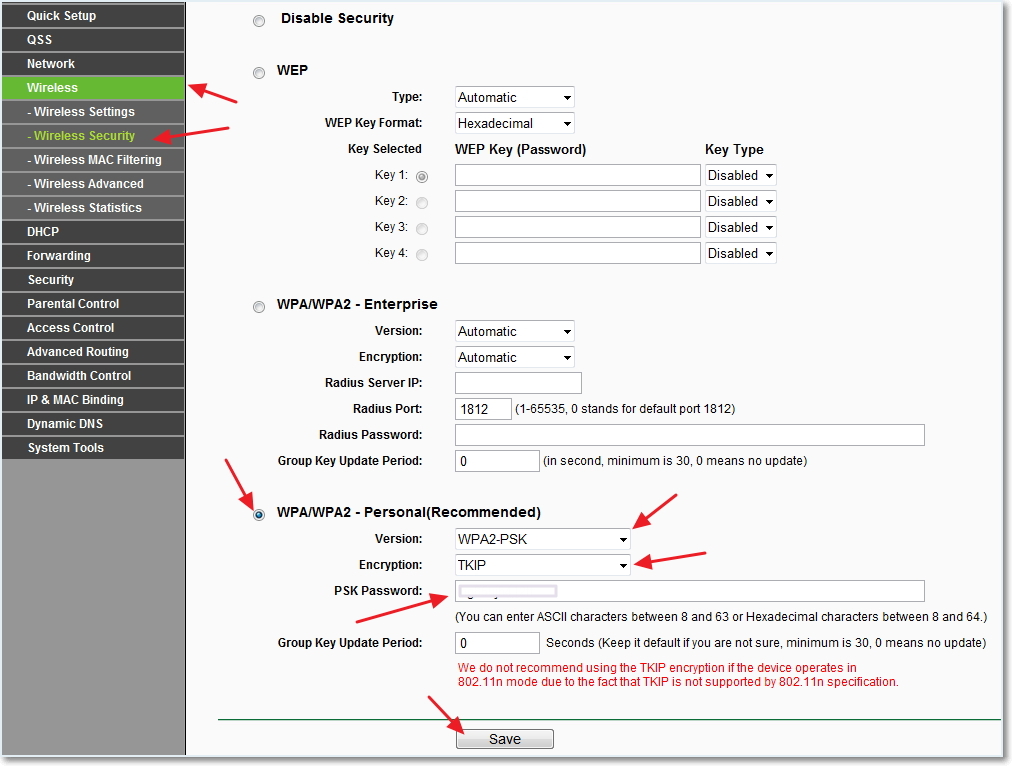
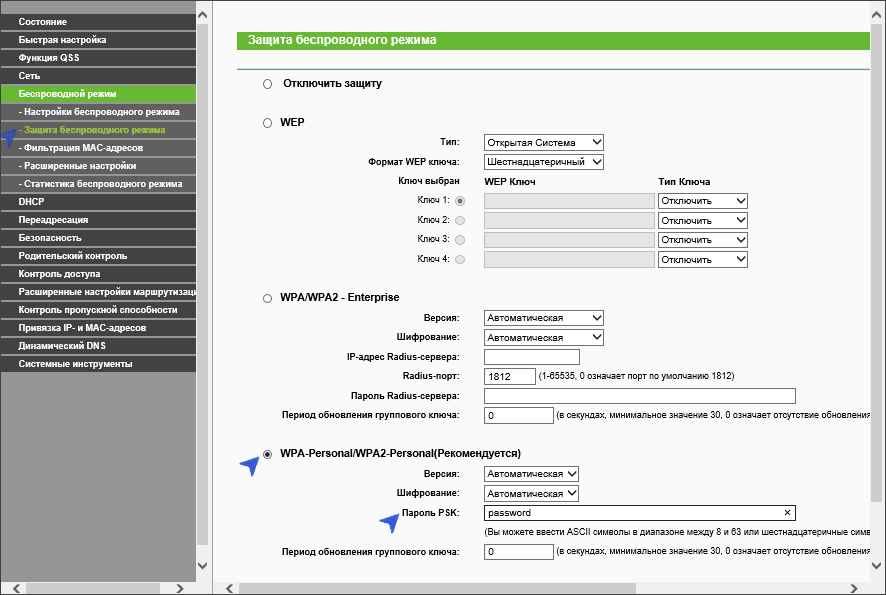
Now you need to protect our connection, go Wireless / Wireless - Wireless / Wireless Protection. Choose what we recommend. In the PSK Password line, you need to enter the security key, which should consist of characters in the range between 8 and 63 (you can also use numbers and Latin capital letters A-F);
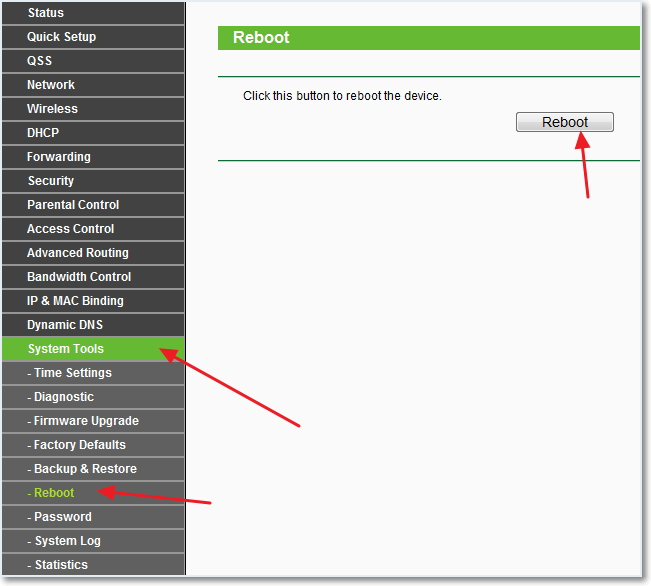
After you have saved all the settings, you need to restart the device. To do this, go to the System Tools tab - Reboot. Click on the Reboot button and wait for a full reboot.
This completes the configuration of the router. As you can see, there is nothing complicated and intricate here. You can do everything yourself and effortlessly.
In this guide, we will look at how to configure Wi-Fi in detail. tP-Link router TL-WR841ND for the following Internet providers most popular in Russia:
- Beeline
- Rostelecom
The following configuration steps will be considered step by step:
- How to connect TP-Link TL-841 ND
- How to enter the settings and set the Beeline or Rostelecom connection parameters
- Security setting wireless network (Wi-Fi password)
- Tuning TV Rostelecom and IPTV Beeline
In general, you can proceed: setting up the router is unlikely to take you more than 10 minutes.
How to connect a router
On the back of the TP-Link TL-WR841ND wireless router, there are five ports, one of which is labeled WAN - you need to connect a Beeline or Rostelecom cable to it, depending on which ISP you use.
Also, there is a short network cable included with the device: connect one of the LAN ports on the router with the network card of your computer or laptop. Customization can be done without using wire connectionvia Wi-Fi, but if you can, use a wired connection better.
Another important point: during the setup, the connection Rostelecom (High-speed connection) or Beeline (L2TP) on the computer itself should be broken - no need to connect it and after you have configured the router, it will establish the connection on its own and then “distribute” it to other devices.
And the last thing: if in the next step you don’t manage to enter the settings web interface,.
How to enter the settings of the router
To enter the TP-Link TL-WR841ND settings web interface, launch any browser and enter 192.168.0.1 or tplinklogin.net in the address bar, and when you are asked to enter your login and password, use admin and for this and the other. I note that the default login information is on a label at the bottom of the wireless router.
After logging in you should be on the main settings page of the router. On some devices it is present only in the English version - I will give the names of the menu items in two languages.
Configuring TP-LINK TL-WR841ND for Beeline
To set up Beeline Internet connection, in the menu select “Network” - “Internet” or “Network” - “WAN”. On the page that opens, you need to enter all the connection settings for Beeline, namely:
- Type of WAN connection (WAN Connection Type) - L2TP or Russia L2TP
- Username and password (UsernameandPassword) - data from home internet Beeline
- Server name orIP address (VPNServername) - tp.internet.beeline.ru
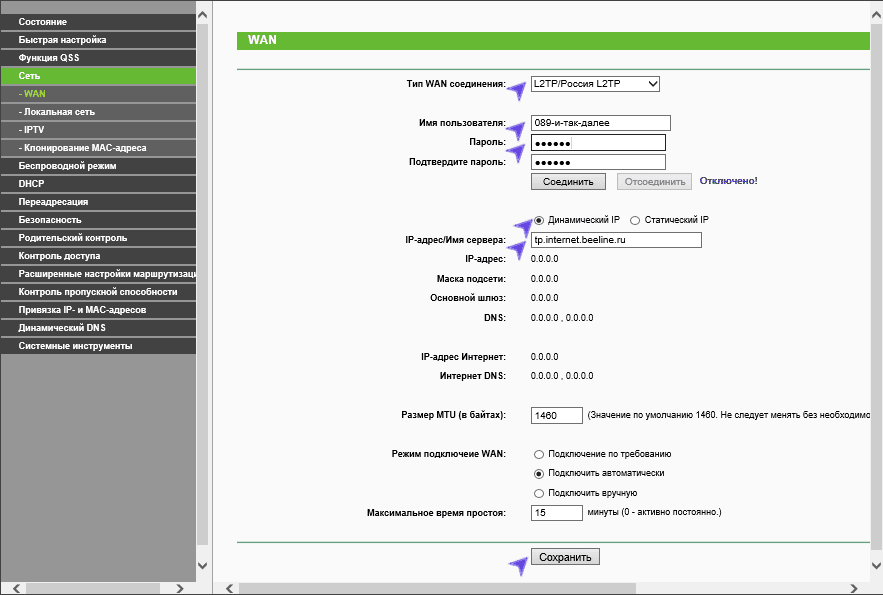
Save these settings, something else in them is not necessary to change. If the settings have been entered correctly, and the Internet is not connected on the computer itself, then in a minute the router will establish a connection to the Internet, you will be able to open sites on the computer, Skype will connect and so on. You can proceed to setting up the parameters of the wireless Wi-Fi network (hereinafter, after describing the settings for Rostelecom).
Configuring TP-Link TL-WR841 ND for Rostelecom
To configure the Internet with Rostelecom on TP-Link, go to “Network” - “Internet” (Network - WAN), then on the page set the following connection parameters:
- Type ofWAN connection - PPPoE
- Username and Password - your login and password from the Internet that you received from Rostelecom
- Secondary connection - disable
- ModeWAN connection - connect automatically.
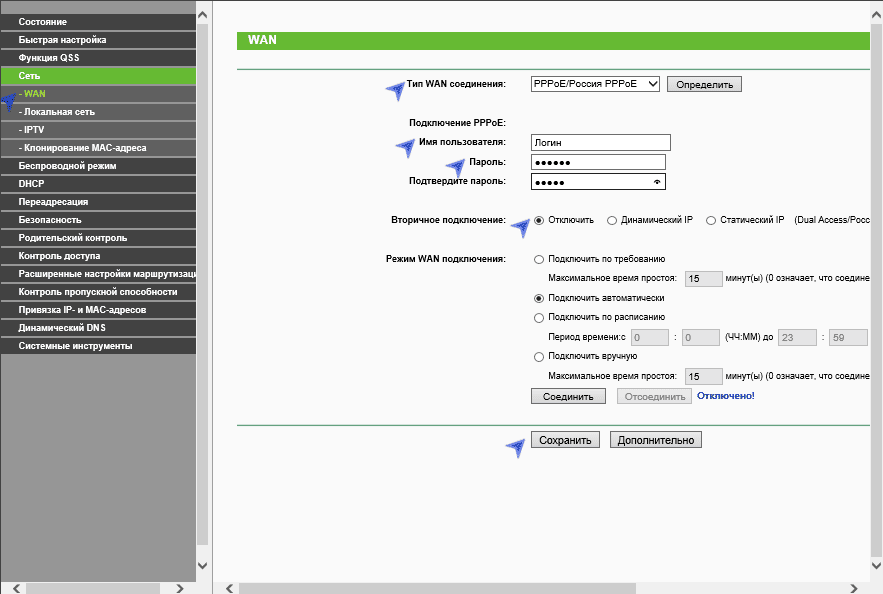
Save your settings. After a minute or two, refresh the page and you will need to see that the connection status has changed to “Connected”. So it was all done right.
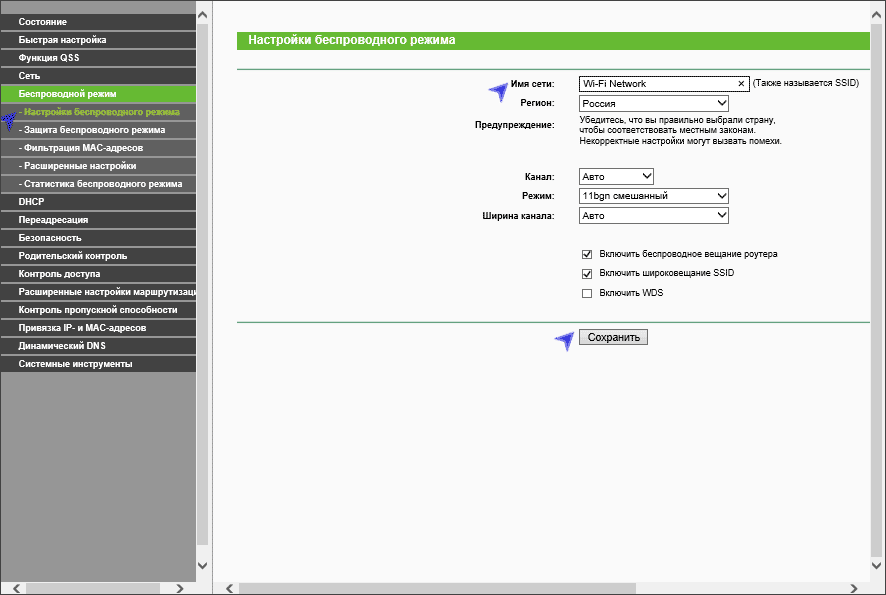
Wi-Fi network setup
To configure the wireless network settings, open the Wireless menu item (Wireless) and then the Wireless mode settings. On the page that opens, enter a name for your Wi-Fi network (SSID). The name can be any, by it you will distinguish your network from others. Just do not use Cyrillic. Save the settings.
Open the item “Wireless Security” (Wireless Security) and set a password for Wi-Fi:
- Select WPA-Personal / WPA2-Personal
- In the “PSK Password” item, enter a password consisting of at least 8 characters and not containing Russian letters.
- Save the settings.
After applying the settings, you can connect to the router from a laptop, tablet or phone via Wi-Fi and use the Internet.
IPTV television setup
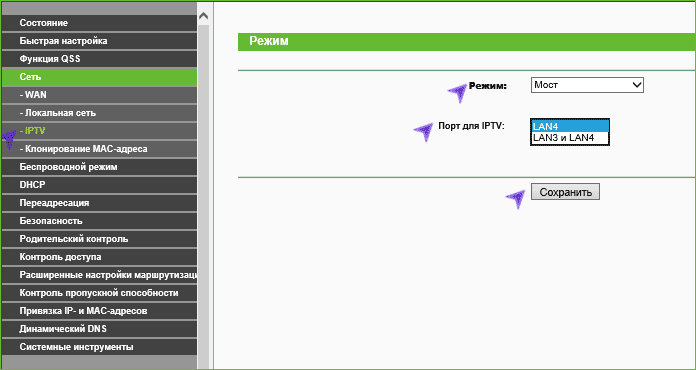
To customize iPTV television Beeline or Rostelecom, open the “Network” - “IPTV” menu item, select the “Bridge” mode and in the Port for IPTV field, specify the number of the LAN port to which the set-top box will be connected. Save the settings.
1. By default, login admin, password admin.
2. Customized couriers should change the password to the Serial number shown on the box (S / N) in the settings. When reconfiguration, it is also recommended to use as a password to the router and wi-fi S / N (serial number).
3. Resetting the router settings is done by pressing and holding the Reset button on the back panel of the router for 10 seconds.
Authorization
In order to get into the web interface of the router, you need to open your Internet browser and type in the address bar http://192.168.1.1, User Name admin , Password - admin (provided that the router has factory settings and its IP has not changed).
Change factory password.
For security reasons, it is recommended to change the factory password.
Default: login admin, password admin.
In the interface of the router, you must go to the tab System tools and choose Password.
In field Old User Name enter admin Old password enter admin.
In the fields New User Name, New Password, Confirm New Password enter a new login (you can leave the old “admin”), as well as a new password and repeat it accordingly.
Then click Save.
CustomizationWi-Fi on the router.
In the interface of the router, you must select the tab on the left " Wireless ", In the list that opens, select" Wireless serrings».
We set the parameters as follows:
1. The field " SSID": Enter the name of the wireless network.
2. Region: Russia
3. Chanel: Auto
4. Mode: 11bgn mixed
5. Channel Width: Automatic
6. Max Tx Rate: 300Mbps
7. Click below the button " Save»
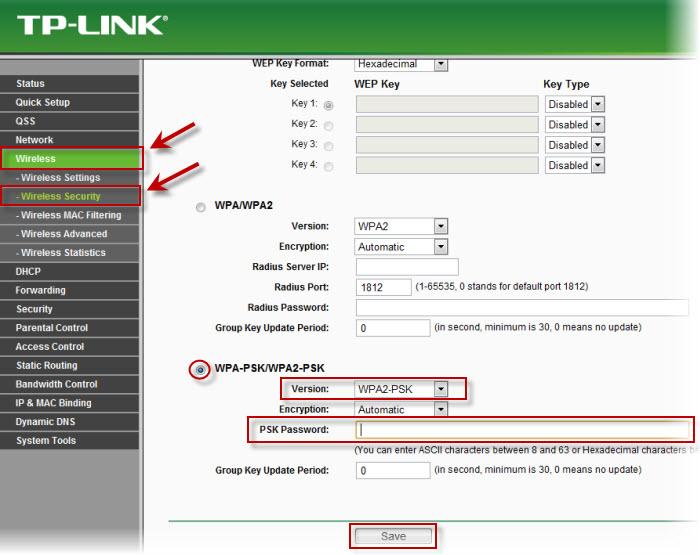
On the left in the menu, select " Wireless", Further " Wireless security"And set the parameters:
1. Set the point on WPA-PSK / WPA2-PSK
2. Version: WPA2-PSK
3. Encryption: Automatic
4. PSK Password: must enter any set of numbers, from 8 to 63 in length. They must also be remembered so that you can specify them when connecting to the network. It is recommended to use the device serial number as a key (indicated on the box, in the form of S / N).
5. Click below the button " Save»
Internet connection setup.
CustomizationPPPoE connect.
1. On the left, select the menu Network, Further MAC Clone
2. Click Clone MAC address, Further Save (for details, see in section "IAC cloning addresses»)
3. Next, select the left Wan
4. WAN Connection type:PPPoE
5. User Name:Your login from the agreement
6. Password: Your password from the agreement
7. Set point on Connect Automatically
8. Press the " Save».
Configure PPtP (VPN) when automatically obtaining a local IP address (DHCP).
1. On the left, select the menu Network, Further MAC Clone
2. Click Clone MAC address, Further Save (for details, see in section "IAC cloning addresses»)
3. Next, select the left Wan
4. WAN Connection type:PPTP
5. Username:Your login from the agreement
6. Password:Your password from the contract
7. Server IP Address / Name:ppp.lan
8. Set point on Connect Automatically
9. Save settings with " Save»
Configure PPtP (VPN) with a static local IP address.
1. WAN Connection type:PPTP
2. Username:Your login from the agreement
3. Password:Your password from the contract
4. Set point on Static IP
5. Server IP Address / Name:ppp.lan
6. IP Address:We drive your IP address under the contract
7. Subnet Mask:We drive a mask under the contract
8. Gateway:We drive the gateway under the contract
9. DNS:212.1.224.6
10. Set point on Connect Automatically
11. Save the settings with the button " Save».
NAT when automatically obtaining an IP address (DHCP).
1. On the left, select the menu Network, Further MAC Clone
2. Click Clone MAC address, Further Save (for details, see in section "IAC cloning addresses»)
3. Next, select the left Wan
4. WAN Connection type:Dynamic IP
5. Save the settings with the button " Save».
MAC address cloning (required when setting upPPPoE, PPTP with dynamic settings andDHCP)
Save / restore settings of the router.
menu Backup & Restore.
To save the current settings of the router, you must click Backup. The settings file will be saved to the specified location on the hard disk.
To restore the settings from the file, you must click the file select button, specify the path to the file with the settings, then click Restore.
Despite the fact that the TP-Link TL-WR841ND router has been discontinued, I decided to prepare detailed instructions by setting it up. With photos, screenshots, and detailed description customization process. Should get a guide for dummies. Which, it seems to me, will be useful to many people not only for setting up, but also in the process of solving some problems with the router. Since this is a very popular router, I am sure that this guide will be relevant for more than one year.
TP-Link TL-WR841ND is really a very popular model. This router, along with its "little brother" TL-WR841N (which differs essentially only fixed antennas) almost always occupied the top sales in the most popular online stores. Yes, and their popularity is noticeable even on the instructions on this site, and for questions in the comments. This model has been updated and improved many times. There are 11 hardware versions. A really good router with a good price / quality ratio.
As for the configuration of TP-Link TL-WR841ND, everything is very simple there. , which comes bundled, or through a web-interface. I will configure through the control panel (through the browser). As in the case of any router, the main thing is to set the correct parameters for connecting to the Internet. Then, you need to configure a Wi-Fi network and it is desirable to change the password to log into the control panel. If you have an IPTV, then you also need to make some adjustments.
I will try to paint everything as detailed as possible. In some cases, I will provide links to other useful articles. Yes, do not collect all the settings (which are not useful to many) on one page, and that the instruction was not very big and confusing.
It is advisable to do before setting:
How to connect TP-Link TL-WR841ND and enter settings?
You can immediately connect a power adapter to the router and plug it into a power outlet. If the indicators on the router do not light up, then check whether the power is turned on with a button that is located next to the power adapter connector.
If you have a desktop computer or laptop, then I advise you to configure the router via a network cable by connecting it to a computer. Connect the TP-Link TL-WR841ND to the computer with the network cable that comes in the box.
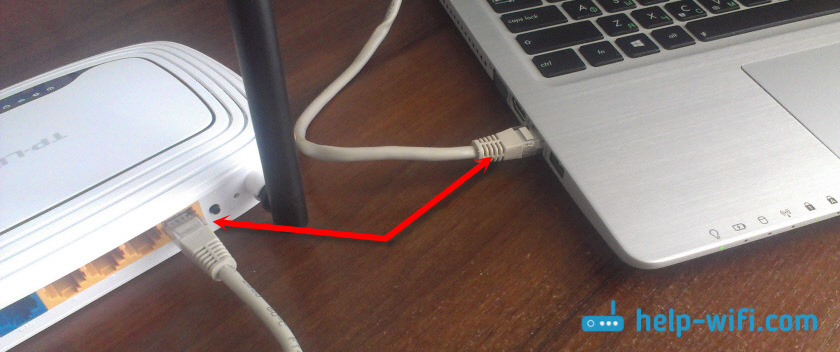
Then plug the cable from your ISP or ADSL modem into the router's WAN port.
Make sure you have everything connected correctly.
What if there is no computer / laptop?
In this case, you can configure the TL-WR841ND from your phone or tablet. It is clear that the connection via the network cable will not work. Therefore, you need to connect to the Wi-Fi network, which will distribute the router immediately after switching on. The factory name of the Wi-Fi network is indicated (although not always) on the sticker below the router. If the network is closed with a password, the password itself (PIN) is also indicated on the router itself.

When everything is connected, sit down at the computer, or take mobile device from which we will configure TP-Link TL-WR841ND, open any browser, and go to tplinkwifi.net. You can also open the settings at 192.168.0.1 , or 192.168.1.1 .
Address to enter the settings of the router, and the factory login / password you can see on the sticker on the device itself.
The address may depend on the hardware version of the router. On the login page you need to specify a username and password. Factory: admin and admin.
Articles that may be useful at this stage:
- What to do, if .
To configure, you can use the wizard Quick setup"(Quick Setup). It may be more convenient for you.

I will show the setup process without a wizard.
Internet connection setup
As soon as we log into the web interface of the router, the first step is to set up an internet connection. Simply put, in the settings of the router, select the type of connection that your provider uses, and, if necessary, set the necessary parameters.
To configure everything without any problems, you must have accurate connection information. You need to know what type of connection to specify in the settings. This information you can check with the support provider. And if you do not have "Dynamic IP", then you will need to specify additional parameters. This is usually a username and password. Maybe even the server address. This information is issued by the provider. It would also be nice to clarify if there is a binding by MAC address.
Only when you have the necessary information, you can begin to configure. Otherwise, there may be many futile attempts.
Dynamic IP (DHCP)
If your provider uses this type of connection, then the Internet through the router should work without additional configuration (if the router is at the factory settings). Since "Dynamic IP" is the default.
In the section "Network" - "WAN" you need to check whether the necessary type of connection is established.

If everything is connected and configured correctly, but the Internet through the router does not work, then most likely your provider binds to the MAC address. Refine this point. If there is a binding, then you need to clone the MAC address from the computer to which the Internet was previously connected to on the router, or register the MAC address of the router with the provider. It is listed on the bottom label.
You can clone a MAC on the Network tab - MAC Address Cloning.

The router must be connected via cable to the PC to which the Internet was attached.
PPPoE and PPTP on TL-WR841ND (Rostelecom, Beeline)
In the WAN section, select the appropriate PPPoE connection type, or PPTP. And below specify the necessary parameters. This is usually a username and password. Also, most likely you need to set "Dynamic IP", and be sure to check that it is set to "Connect automatically".

After that you can try to start the connection. And if the connection is established, save the settings.
PPTP is configured exactly the same. Only there may still need to specify the server address (it, as well as other parameters, is issued by the provider).
What if there is no internet connection?
Check the cable connection in the WAN port. Make sure you set the correct parameters. And specify if there is a binding by MAC-address. All this you can find out from your provider. Also pay attention to how the Internet indicator behaves. On TP-Link TL-WR841ND, it should actively blink green. Make sure that the Internet works directly (without a router).
Important! If you have started a connection to the provider before installing the router on your computer, now you do not need to do this. We set up this connection on the router. Now he will establish a connection to the Internet.
If the Internet through the router does not work, then it makes no sense to continue the configuration.
Useful articles