How to enter the mood. Installation and connection of a home Wi-Fi router
Creating a wireless home network is the most adequate solution to the problem of Internet access from several devices at once. But before you put this idea into practice, you need to figure out how to connect the router to the computer.
Location of the router
Before you connect the router to a computer, you need to properly position it indoors so that the Wi-Fi signal covers the largest possible area. It is necessary to take into account many factors, up to the material of the walls and the characteristics of the environment, because the most unexpected object can become a hindrance: for example, an aquarium.
Often users put the router on the table near the monitor or put it on system unit. It’s impossible to call this arrangement absolutely right: on the one hand, the Wi Fi signal will be distributed indoors, but its quality and coverage area will not be of the highest level.
Try to place the router as high as possible and around the middle of the house. As an example, you can look at the optimal location of the router in the apartment:
If the house has two floors, then it is better to place the router something like this: 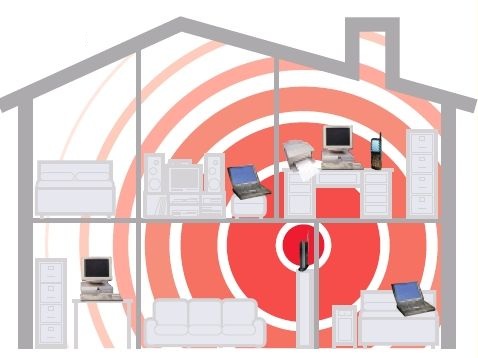
You can check the signal quality using a laptop or smartphone: the device is connected to the current wireless network, and you are in the hands of him moving around the rooms, determining where Wi-Fi works fine, and where it is bad.
Connection
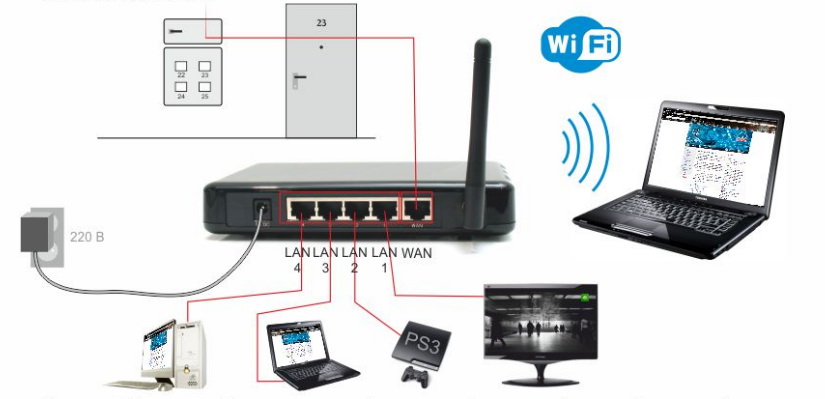
Manufacturers of routers operate according to a single standard, according to which all ports are located on the rear panel of the router. The number of connectors may be different, but there is a classic scheme that occurs most often:

Connection is as follows:
After connecting, the most interesting begins - the router needs to be configured to go online and distribute Wi-Fi.
Router Setup
Almost all routers are initially configured to access the Internet via Dynamic IP, so if your provider uses this data transfer technology, you will not have to create a new connection. However, in any case, it is necessary to specify the operating parameters of the wireless network, so it will not be possible to do without the settings.
Network card settings
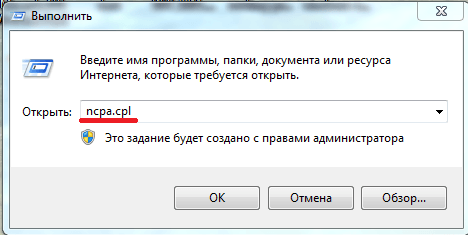
First of all, you need to connect the network card (if you have not already done so) and adjust its operation parameters. This can be done in the section “ Network connections", Which can be opened in two ways:
In the “Network Connections” window you need to find the established connection over the local network, right-click on it and select the “Properties” item. 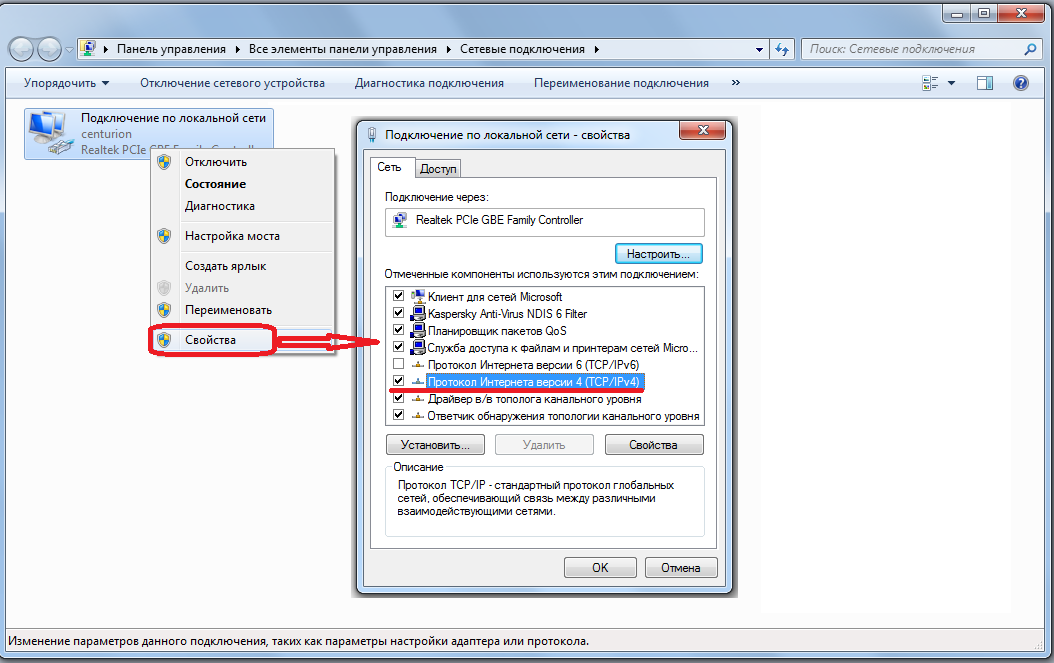
The next step is to open the TCP / IPv4 Internet Protocol properties. Here you need to install automatic data acquisition for work in the network as shown in the screenshot. 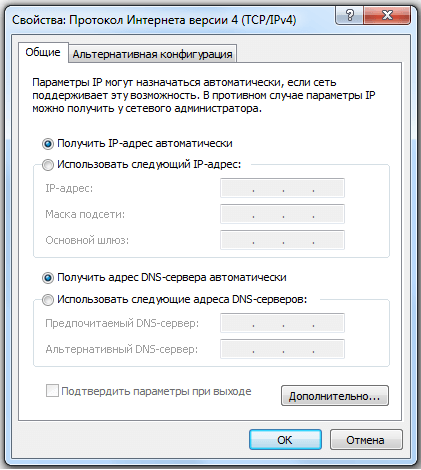
After that, you can close all the windows and proceed to the configuration of the router itself.
Router web interface
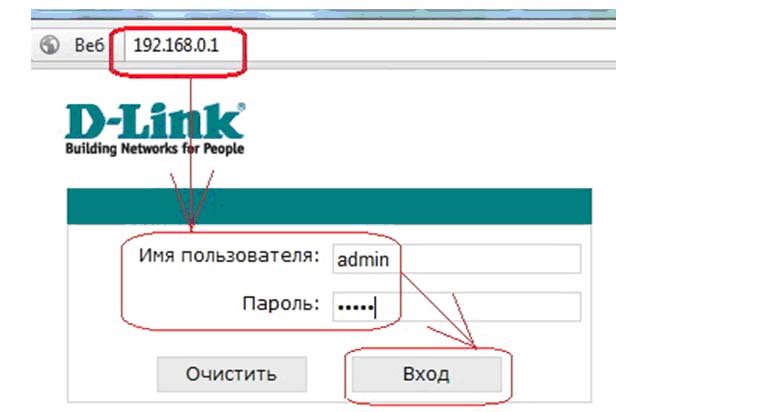
The interface with the settings of the router is available through a browser at 192.168.0.1 (D-Link, NetGear) or 192.168.1.1. There may be other options, so it is better to clarify the IP address of the router in advance by its model. You can often find this information on a sticker that is located on the bottom of the network device case. 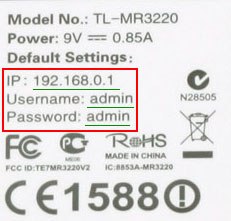
The procedure is as follows:
After that, the screen should display the web interface of the router through which further configuration is performed. Depending on the device model and firmware version, the interface looks different, but the configuration algorithm is always the same:
- Create a new internet connection with the data provided by the provider.
- Creating a wireless network with the choice of the name of the access point and authentication mode, as well as specifying a password.
- Set up an interactive television if this service is provided by the provider.
- Save device configuration.
Detailed configuration needs to be sought for each specific router model. If you need to customize local network through wifi router, for example, to connect a laptop to a laptop, then you will also need to look for a separate manual.
The web interface does not open
Sometimes users are faced with the fact that the browser web interface does not open. If you have such a problem, follow these steps:
- Make sure the LAN cable is working and installed correctly.
- Check the network card settings. It may have the wrong IP address.
- Try manually setting the router's address in the TCP / IPv protocol properties.
Ping the router by exchanging a data packet with it. Open up command line and write in it "ping 192.168.1.1" (depending on the address of the router). 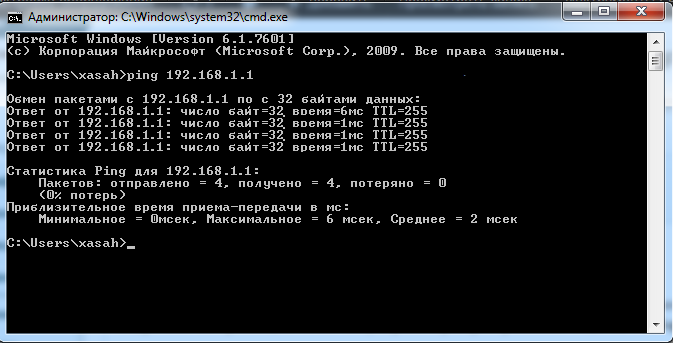
If the packet exchange was successful, try to enter the settings of the router through another browser.
If the ping fails, check the firewall settings; you may need to configure Windows firewall or disable it temporarily if it denies access to the connected device.
If the web interface does not open due to an incorrectly entered password, reset the parameters of the router to the factory settings by clicking the "Reset" button on its case.  The last option is a browser check. It may not be working. Update your browser or reinstall it.
To understand what the article is about, it is necessary to understand the meaning of the word "Interface". This word means the possibilities, methods and methods of interaction between the two systems. The interface of the router is its connection, communication with something.
In our case, there are two interfaces:
- One system is the person (user), the second system is the router itself. That is, the user needs to go into the settings of the router and make some changes there to make it work under their requirements. This is the settings interface.
- One system is a computer network, the second system is again the router itself. That is, it must communicate with the computer network (actually for what it was created), for this the router must be connected to the network either by wire (LAN, WAN ports, etc.) or via Wi-Fi. This is the connection interface.
Consider both interfaces in more detail, and start with the settings.
Router settings interface
As we already understood, in order to configure a router, we need to enter into dialogue with it. That is, we give him a command, he hears us, understands, and performs. The interface, that is, the intermediary between the user and the router, will be the most common web browser (IE, Firefox, Opera, etc.). It happens as follows.
We connect the router to the computer with a network cable, patch cord, or via Wi-Fi, and launch the web browser. Any router has a network IP address - we enter it into the address bar of the browser. For example - 192.168.1.1.
Login to the router settings
The address of your router is not difficult to find out - either turn it over and read the IP on the label under the bottom, or in the instructions for setting up the router.
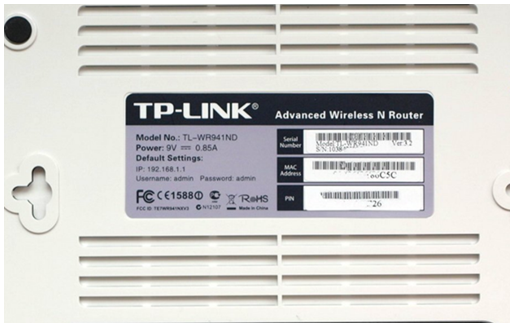
IP address of the router on the label under the bottom
Press "Enter", and the router will immediately ask - and with whom I have the honor to communicate? That is, authorization is required. Username and password are also listed under the bottom of the router and in the manual. Enter them into the appropriate fields and enter the settings menu.
Router settings
After entering the settings, the direct communication with the router and its setting begins. For convenience for a person (but not for a computer or router), settings are made in a convenient menu, with items and sub-items.

Router settings window
All this “clarity” and “consistency” of the menu is needed only by a person, and it really works - it is very easy and quick to configure a router, even for a user with little experience. It speaks of a friendly interface.
For example, we need to configure Wi-Fi.
Configure Wi-Fi router
Of course, we go to the menu item "Wireless", which means a wireless network.
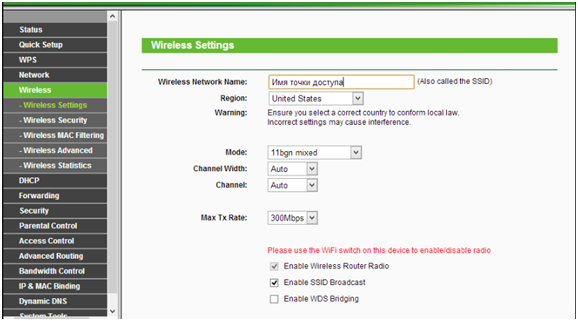
Wi-Fi setup router
In the window that opens, we configure the Wi-Fi network, nothing else. User and router are communicating, mutual understanding, interface.
Network interface
Consider the second case of the interface, already physical (previously was interactive). Although at first glance there is nothing in common between them, but there is something in common - this is an interface. Only in this case is already networked - is the physical connection of the router to computer network wires with special connectors (ports), or a wireless connection, which in this case is not important.

Network interfaces of the router on the rear panel
In these ports and made a physical connection of computer network wires. There are at least two of them - “looking” to the outside world, that is, connecting to another network or provider (WAN port), and “looking” to their own internal network (LAN ports). operating system Linux even assigned names to these ports - the WAN port is labeled “eth0”, and the LAN port is “eth1”.
Wired interface
For wired connection need a network wire. There are several types of them - twisted pair, coaxial cable and optical fiber.
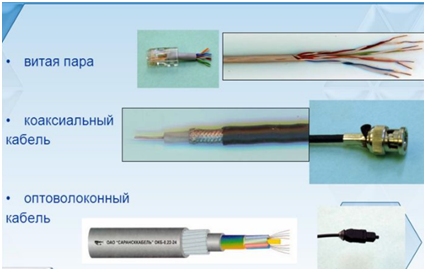
Types of network cables
Each type has its own connector for the connection, that is, a coaxial cable cannot be connected to the twisted pair port.
The most commonly used type is twisted pair - the golden mean between price and data transfer rate. The cable is connected to the corresponding port of the router (network interface of the router), and the other end to the network card of the computer (network interface PC).

Connect to computer
For different types of explorer this connection procedure is not different, they are of the same type.
Configuring WAN and LAN Interfaces
Having connected wires, we will pass to setup of a router. The procedure for entering the settings through the web interface, we read at the beginning of the article. Going to the settings, go to the tab "Network".
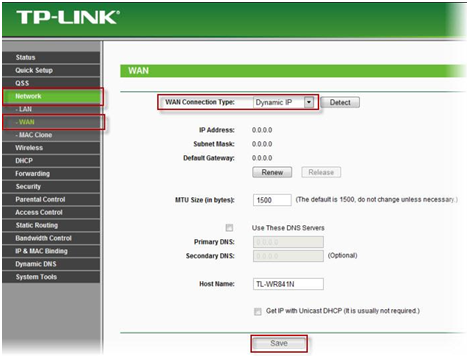
Wired Network Setup
By selecting a menu item, a submenu will open, containing separately the LAN and WAN port settings. Go to the appropriate subparagraphs and customize the way we need. Specifically, the settings in this article are not considered.
After entering the changes, be sure to click “Save” so that the changes are saved and activated.
Wireless interface
Wires are now a thing of the past, and are increasingly being devoted to the development of wireless interfaces. These include Bluetooth, infrared transmission and, of course, Wi-Fi. It is for the Wi-Fi future.
Through Wi-Fi, computers and routers are connected over the air using radio waves at 2.4 GHz and 5 GHz (in development and 6 GHz). Communication requires radio modules and antennas.

Wi-Fi router
Turning on the router, it creates a wireless network that needs to be detected by the computer and connected to it. A wireless network has a name, and according to the rules of good tone - the password to connect to it.
All found networks are displayed on the desktop of the computer in the lower right corner.
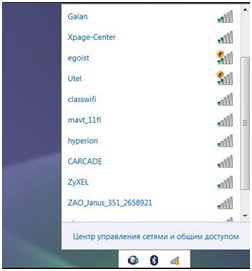
List of detected Wi-Fi networks
Clicking the mouse twice on the name of the network, we connect to it. But first you need to configure it in the settings of the router. How to enter the Wi-Fi settings was described in the first part of the article.
D-Link DIR-615. Setting up the most popular model of the router from D-Link - DIR-300, was considered in.
- How to enter the web interface of the router.
- Change password by default.
- Internet connection setup.
- Configure PPPoE connection.
- NAT when automatically obtaining an IP address (DHCP).
- Configure Wi-Fi on the router (WLAN).
- Check your internet connection.
- Save / restore settings of the router.
How to log into the web interface of the router
To get to the web interface of the router, open your Internet browser and in the address bar type: 192. 168.0.1. In the window that appears, enter Username — admin , Password – admin (provided that the default settings on the router and its IP have not changed).
Change password by default
The default login is admin iparol - admin. In the interface of the router, you must go to the " Manual Settingsand then select the tab « System".
In field "Password" and « The confirmation"enter a new password. Then click the button Save. After the done actions, the router will offer to re-enter its settings.
Internet connection setup
In the web interface of the router, you must select the tab Manual Settingsand then select the tab "Network".
Configure PPPoE Connection
1. In the tab "Network" press the button "Add".
2. Select connection type PPPoE
3. In paragraph "Ethernet" Click Clone MAC.
4. In the field "Username" enter your login under the contract with the provider.
5. In the field Password and Password Confirmation enter the password from the contract.
NAT when automatically obtaining an IP address (DHCP)
1. In the tab "Network" press the button "Add".
2. Select connection type
3. In paragraph Ethernet click clone mac.
Configure Wi-Fi on the router (WLAN)
In the web interface of the router you need to go to the tab “Wi-Fi Setup”then press the button "Further".
In the window « Basic settings":
1. Specify the ID SSID Your wireless network (name or network name)
In the window « Security Settings":
1. Choose in the field « Network Authentication: WPA2-PSK.
2. In the field « PSK encryption key You must enter any character set, length from 8 to 63. Write them down so that you can specify them upon further connection to the network.
Checking Internet Connection Status
In the control panel of the router, you must select the tab Manual Settingsthen select the tab "Status".
Saving / restoring router settings
In the web interface of the router, select the tab Manual Settingsthen tab " Configuration.
In field "Saving the current configuration" click on “Save” current settings of the router.
In field "Restoring factory settings" press the button "Factory settings" to restore the initial settings of the router.
The good old usual way of working with a computer is to run the required program on it and to perform the required work with it. But now this approach is being replaced by another one - to launch a service or application on the Internet, and not locally on your computer.
This is work with the help of the so-called “web-interface”, which is becoming more and more widespread. The time is not far off when working with the web interface will be more common than the local computer work that is still familiar to many.
Have you come across such expressions as “web mail interface” or “log in via web interface”? Many users have a question: what is it - the web interface? And is it possible to "try it on a tooth" for an ordinary person?
A web interface is a user's interaction with the website he needs via a browser.
In particular, the web-based e-mail interface is presented in the form of a regular web-site (, Google, Mail, etc.), which allows the user to work with the mailbox.
Of course, this interaction requires that the user's device (computer, tablet, smartphone) be connected to the Internet.
To log in via the web interface, you need
- open browser
- in the browser to find and open the desired site,
- enter your data on this site (username and password) to access the services and features on the site. That's all.
Consider specific examples. As you know, it is always easier and more understandable with them.
Web mail interface
Let's start with the mail, because everyone has email, and everyone periodically looks through their mailbox.
You can log into your mailbox in two ways:
- via web interface,
- using a special program called an email client (for example, Mozilla thunderbird, The Bat! And Microsoft Outlook).
Novice users usually use the first method.

Fig. 1 Go to Yandex.mail through the web interface
To access the web mail interface:
- open any browser
- go to the mail website (for example, go to Yandex, or Mail.ru, Google, Rambler, Yahoo),
- in a special form we enter our data (figures 1 and 2 in Fig. 1) to access our mail. Click "Login" (either of the two numbers 3 in Fig. 1).
In this special form, there are usually buttons
- "Registration" (or "Create a box" - figure 4 in Fig. 1) and
- "To come in".
Click “Register” to enter only if you need to create a new mail. If there is already mail, and a new mailbox is not required, then after entering the login and password, click on the "Login" button.
After that, the browser will load the main Web-page. mailbox. It will contain links to additional web pages that are designed for viewing incoming mail (number 1 in Fig. 2), for setting up mailbox settings (number 2 in Figure 2), and others.
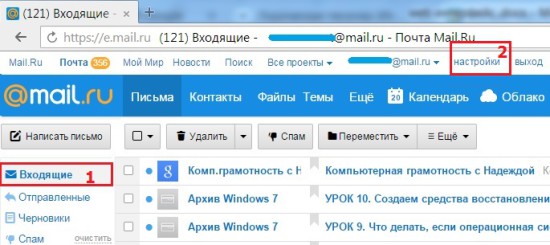
Fig. 2 Type of mailbox on Mail after logging in via the web interface
Cloud Web Interface
There is a cloudy Yandex.Disk about which I wrote. You can work with it through the web interface or, in other words, online, with the Internet connected.
The second way to work with Yandex.Disk is to use a special application, in other words, a special program. To do this, the application must be downloaded and installed on your computer.
Not everyone likes without the special need to install additional programs, besides, users have limited space on the hard drive. For these reasons, many people use Yandex.Disk via the web interface. True, with this approach, "heavy" files will not be able to upload to Yandex.Disk. But in any matter there are pros and cons.
Everything written above can be fully attributed to the web interface.
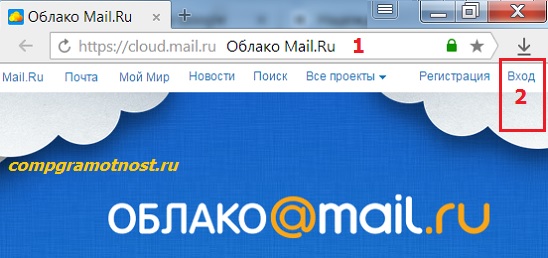
Fig. 3 Go to the Cloud Mile ru via the web interface
The Cloud also has an application that can be installed on your computer. And you can work with the Cloud through the web interface. To do this, open the Clouds website in the browser (number 1 in Fig. 3), and then at the first visit, click on the "Registration" button. If you already have a username and password on Mail, then click on the "Login" button (figure 2 in Fig. 3).
How to enter the modem web interface

Fig. 4 Examples yota modem and Megaphone modem
We will talk about modems similar to those shown in Figure 4. These are the modems of Yota, Megaphone, Beeline, MTS, etc. Others are not considered here.
To enter the modem's web interface, perform the same 3 steps:
- open any browser
- find a site that provides us with a modem (Yota, Megafon, Beeline, MTS),
- enter your details for authorization on the site (username and password). Usually they are entered in the "Personal Account" of the user on the site.
Suppose I have a Yota modem. In this case, the web interface of the modem is my personal account on the Yota website (Fig. 5).
- Click on the tab "Private customers" (number 1 in Fig. 5),
- and then click the “Profile” link (figure 2 in Fig. 5).
- Enter the username and password
after which you can control your modem. It is payment, choice and adjustment of speed and duration of work of the Yota modem, etc.

Fig. 5 go through the web interface modem Yota
If you have a Megaphone modem, then you should go to the Megaphone website. And there, when you first log in, you need to register, and for all subsequent visits to enter your username and password from your personal account on the Megaphone website. More about personal account Megaphone look.
Web interface of the router
The web interface is also used to control various network devices, for example, to control routers. A router is a device designed to “propagate” the Internet, for example, within an apartment or office. During its initial connection, you need to enter special settings that are convenient to do using the web interface.
This is not done so easily, so that it can be described in one or two phrases. Therefore, I suggest that the interested reader see the article “How the provider made me reconfigure d-Link router"Where it is described in more detail. To do this, click on this link.
It is difficult to unambiguously express in words the feeling of success that comes after the successful configuration of such a device, when everything ends safely and the Internet is “distributed” to computers.
1) Enter your e-mail address in this form.